A Pantograph is a drawing aid that simplifies the enlarged copying of pictures or figures. It makes a great educational toy for families with children, or for people who are into craft activities like patchwork, woodworking, modelling, etc.
Below, my Dad describes the design he built. It enables magnifications of 2, 3, 4 and 5 to be obtained by simply relocating two screws, cost just $6 in materials and took just a couple of hours to make.
The major components were made quite easily from aluminium bar using nothing more than a hacksaw and drill, and a file to smooth off any burrs. The four key pieces (the arms) are held together by a few round headed screws and a variety of nuts. I used a pencil holder that I made by bending a surplus piece of aluminium bar riveted to one arm. It could equally have been screwed in place if you don’t have access to a pop rivet gun.
The design is based upon 30cm long arms and is capable of doubling a 15cm picture or magnifying an 8cm picture by 5. If you desire copying larger pictures the dimensions of the four “arms” must be made proportionately larger and the hole spacing also proportionately increased. Alternatively this size can be used by magnifying the picture one section at a time.
The aluminium bar used was 12mm wide by 3mm thick, purchased in a 2.4m length from the local hardware store for about $5.50. It was long enough to make two pantographs. The screws, nuts, dome nuts and wing nuts were all 5/32 inch and cost about $3 per pantograph. I used 5/32 inch because of the variety of nuts available but an equivalent metric size may be used if available.
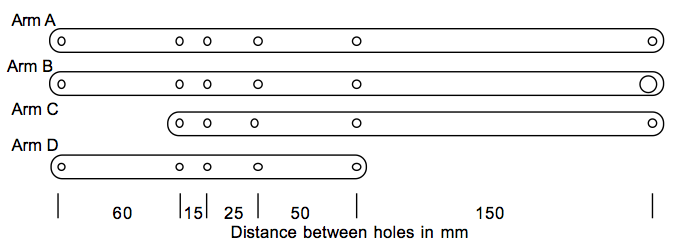
The length of the four arms are:
- Arm A - 31.2cm
- Arm B - 31.2cm
- Arm C - 25.2cm
- Arm D - 16.2cm
A hand held electric drill can be used to make the holes, but I had access to a drill press, so was able to gang drill all four arms at the same time. The most important part here is to accurately mark the location for the holes and ensure that they are not oversized and that you drill them in the right place. Ensuring that they are drilled in the middle of the arm and correctly spaced will provide the accuracy of the final pantograph to make consistent enlargements.
 |
The arms are assembled as shown using the screws, with various nuts, dome nuts and wing nuts:
- Pivot 1 - Screw, cut to length, with dome nut locked in place to give free arm movement, but not excessive looseness)
- Pivot 2 - This is the tracing point. I used a 40mm long screw inserted from the top, with one nut locking it to Arm D, and two nuts locked together below Arm C to permit free arm movement, but not excessive looseness). I ground the end of the screw to make a (not too sharp!) tracing point.
- Pivots 3 and 4 - These are the moveable pivots that determine the magnification. For each I used 25mm screws inserted from below with a nut and a wing nut locked together to permit free arm movement, but not excessive looseness)
For the anchor point, I used a 40mm screw inserted into Arm A from above and locked to the arm with one nut. I tape a small plate with a hole onto my drawing surface, and the screw sits loosely in the hole.
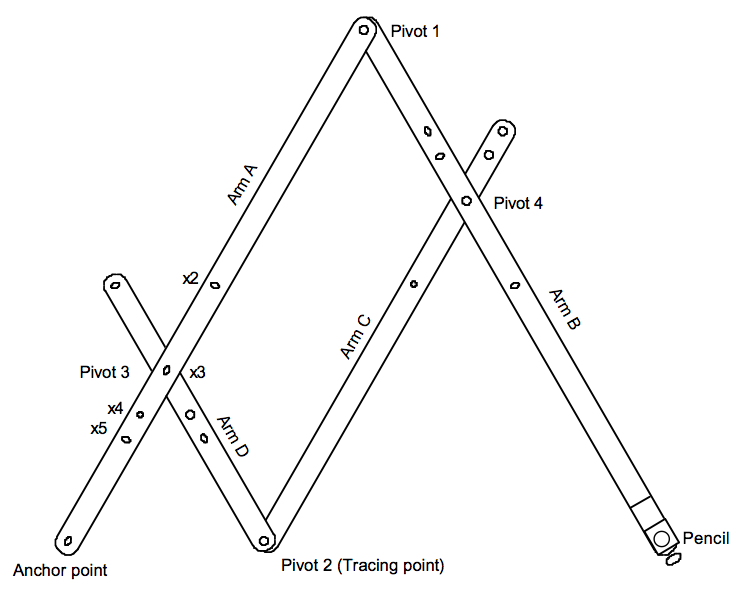 |
The Pantograph is shown set up for threefold expansion (note that when the set up is correct Arms A and C are parallel and Arms B and D are also parallel - you will know if it is wrong as it will not move). Pivots 1 and 2 are permanent and do not need to be undone. Pivots 3 and 4 are moved to select the magnification required ( x2, x3, x4 or x5 ) - the nearer Pivot 2 is to the anchor point the greater the expansion.
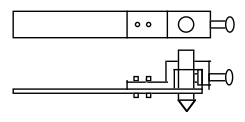
The pencil I use is a cheap mechanical type, locked into the end of Arm B with a screw passing through the bracket and a nut between the bracket and the pencil.
The bracket holding the pencil has four 2 cm legs, two holes for rivets or screws attaching it to Arm B, one hole for the pencil securing screw (with nut between bracket and pencil), and one hole large enough to pass the pencil.
 |
Using the pantograph is simple. The drawing surface should be about 60cm square with the anchor point located in the bottom left hand corner and taped down. With the pantograph in its closed position, the picture to be copied is placed so that the tracing point (pivot 2) is just on the left hand bottom corner of the picture and the picture is then taped down. Place the blank drawing paper so that the pencil sits just on its bottom left hand corner. Move the pencil end so that the tracing point moves to the top right hand of the picture and ensure that the pencil is still on the blank paper. If so, tape down the drawing paper. Sometimes, depending upon the size of the picture, it may be necessary to overlap the the picture and drawing paper and copy the picture one half at a time.