Also known as Hafco MetalMaster AL-60, Grizzly G0516, Sieg C6/M2
Before Using Be Sure To Read This Manual
Editing Notes: small punctuation and wording adjustments were made when the meaning was entirely clear, otherwise the exact misspelling or confusing wording was left unchanged. Consistent spelling was used for words like “headstock” (no space). No responsibility is taken for errors (mine or in the original) or for your actions after reading this document.
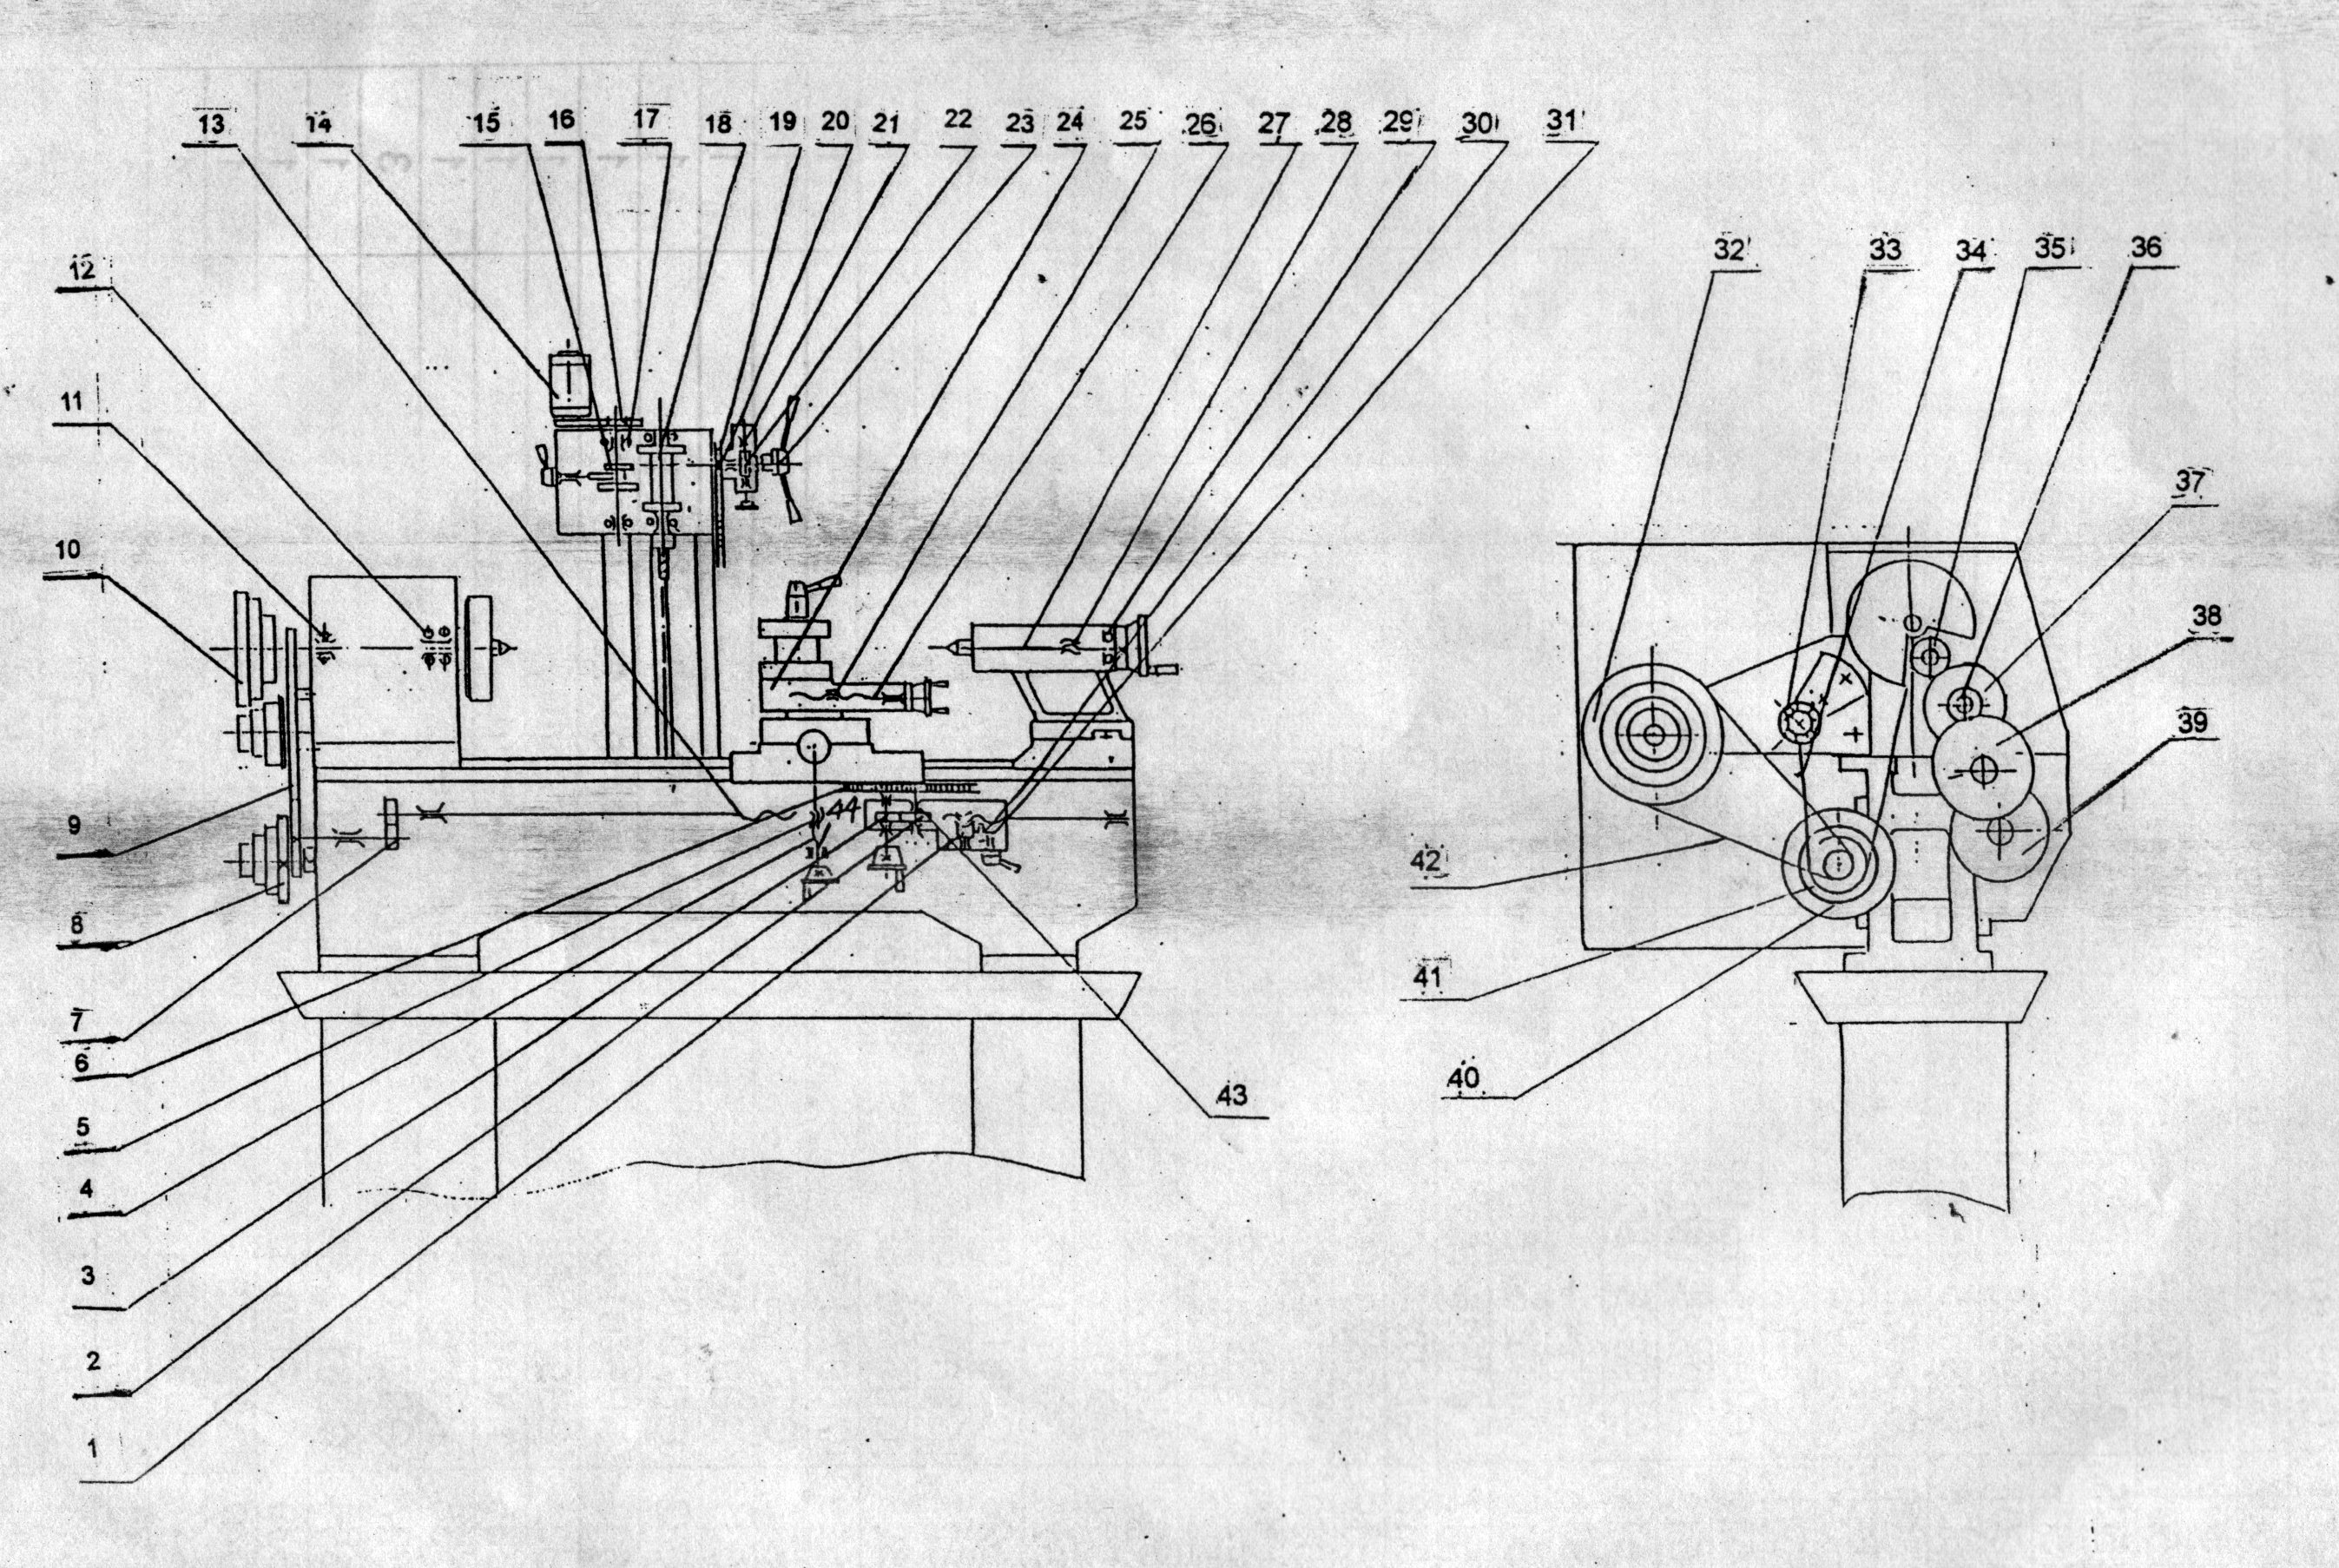
This Multi-Purpose Machine is designed to machine cast iron pieces, steel pieces, non-ferrous metal and non-metal pieces up to ∅250mm. The size of spindle bore allows bar stock up to ∅19.8mm to go through it. It can work out cylinder, cone, steps, end-surface, grooves, holes (drilling, milling and boring). It can also be used for making Metric or Imperial threads. On parts of general purpose.
This machine features high accuracy, reliable quality and easy operation. As no concrete foundation is necessary. It’s Milling/Drilling Head attachment is installed beside the Machine Bed. So the Machine is the ideal choice for shops instrument factories household maintenance, auto repair, light industry machinery factories for production of individual or batch pieces. It is also ideal for school training.
| Specification | Model 400 | Model 550 |
|---|---|---|
| Max Swing Over Bed | 250mm | |
| Max Length of Workpiece | 400mm | 550mm |
| Cutting Spindle Bore | ∅20mm | |
| Bore Taper of Cutting Spindle | MT3 | |
| Cutting Spindle Speed | 125-2000 RPM (6 steps) | |
| Longitudinal Cutting Feed | 0.1-0.2mm/rev | |
| Spindle Speed of Milling Head | 0-2500 RPM | |
| Bore Taper of Milling Head | MT3 | |
| Milling/Drilling Capacity | 13mm | |
| Tailstock Taper | MT2 | |
| Metric Thread | 0.4-3mm pitch | |
| Imperial Thread | 10-44 TPI | |
| Cutting Motor Power | 550W | |
| Milling Motor Power | 350W | |
| Overall Length | 980mm | 1130mm |
| Overall Width | 580mm | |
| Overall Height | 880mm | |
| Net Weight | 175kg | 180kg |
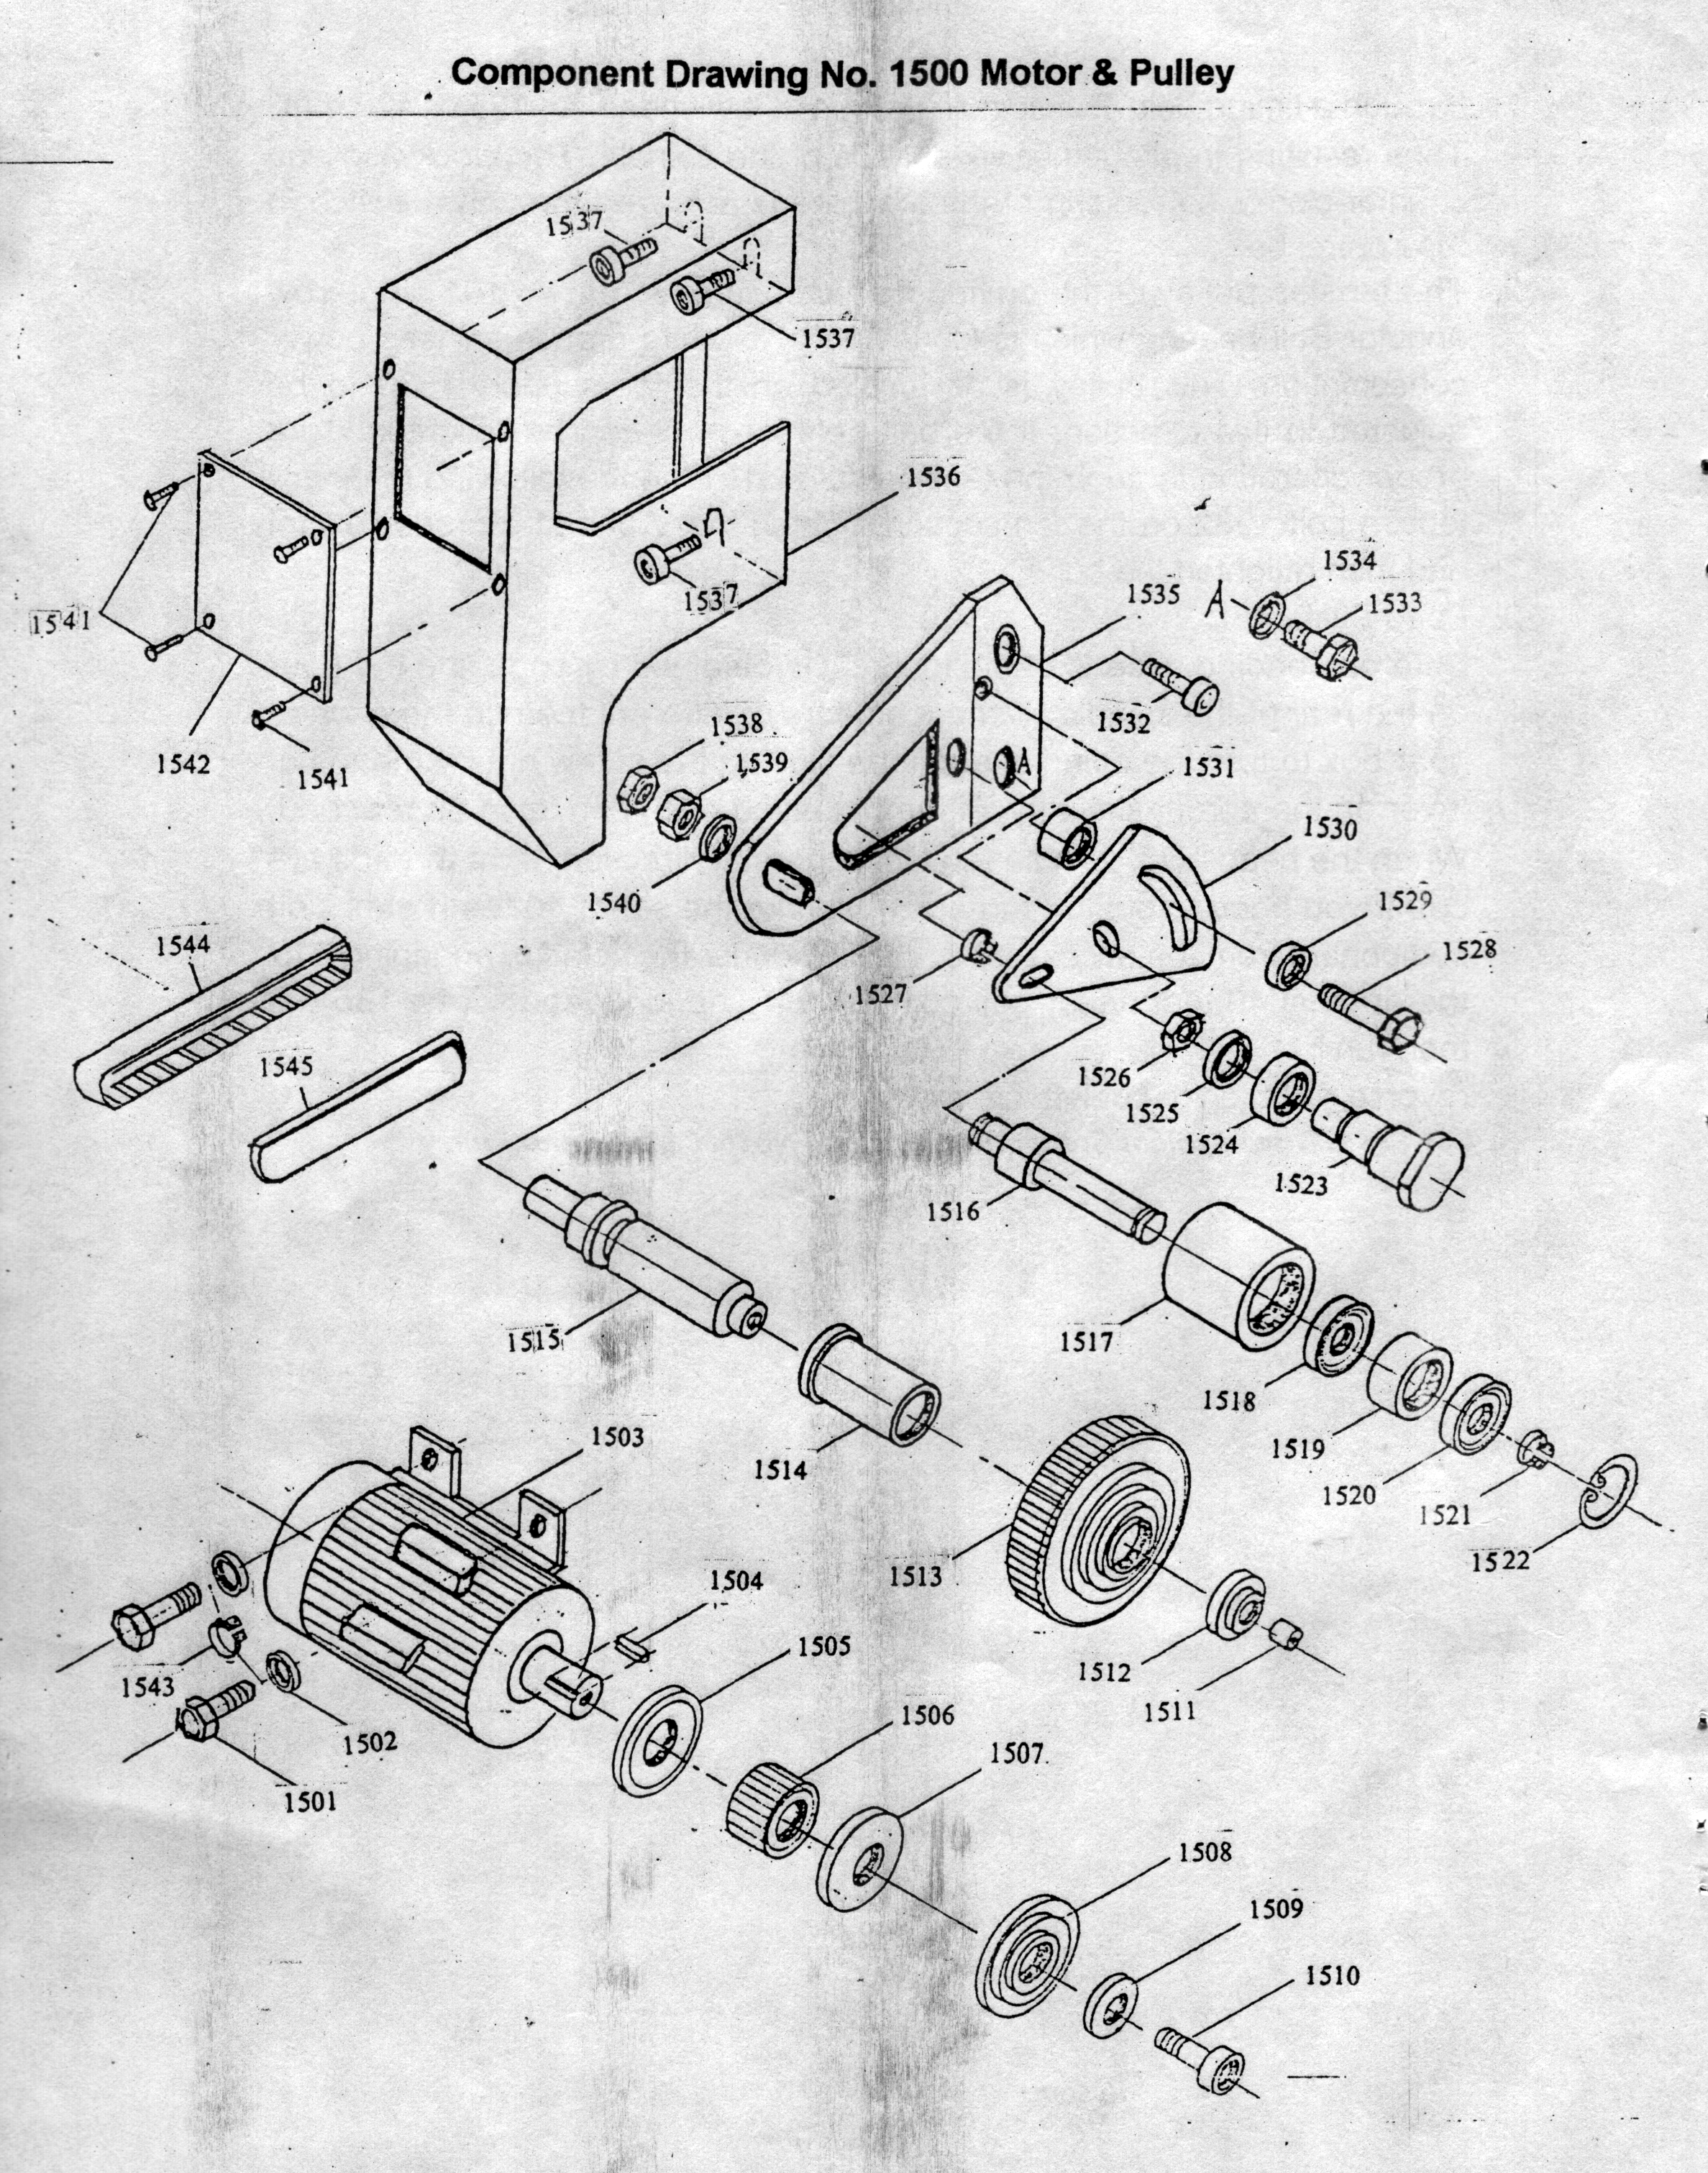
See Component Drawing Number 1500 Motor & Pulley, Parts List of Motor & Pulley, Figure 1 Drive System, Parts List of Drive System.
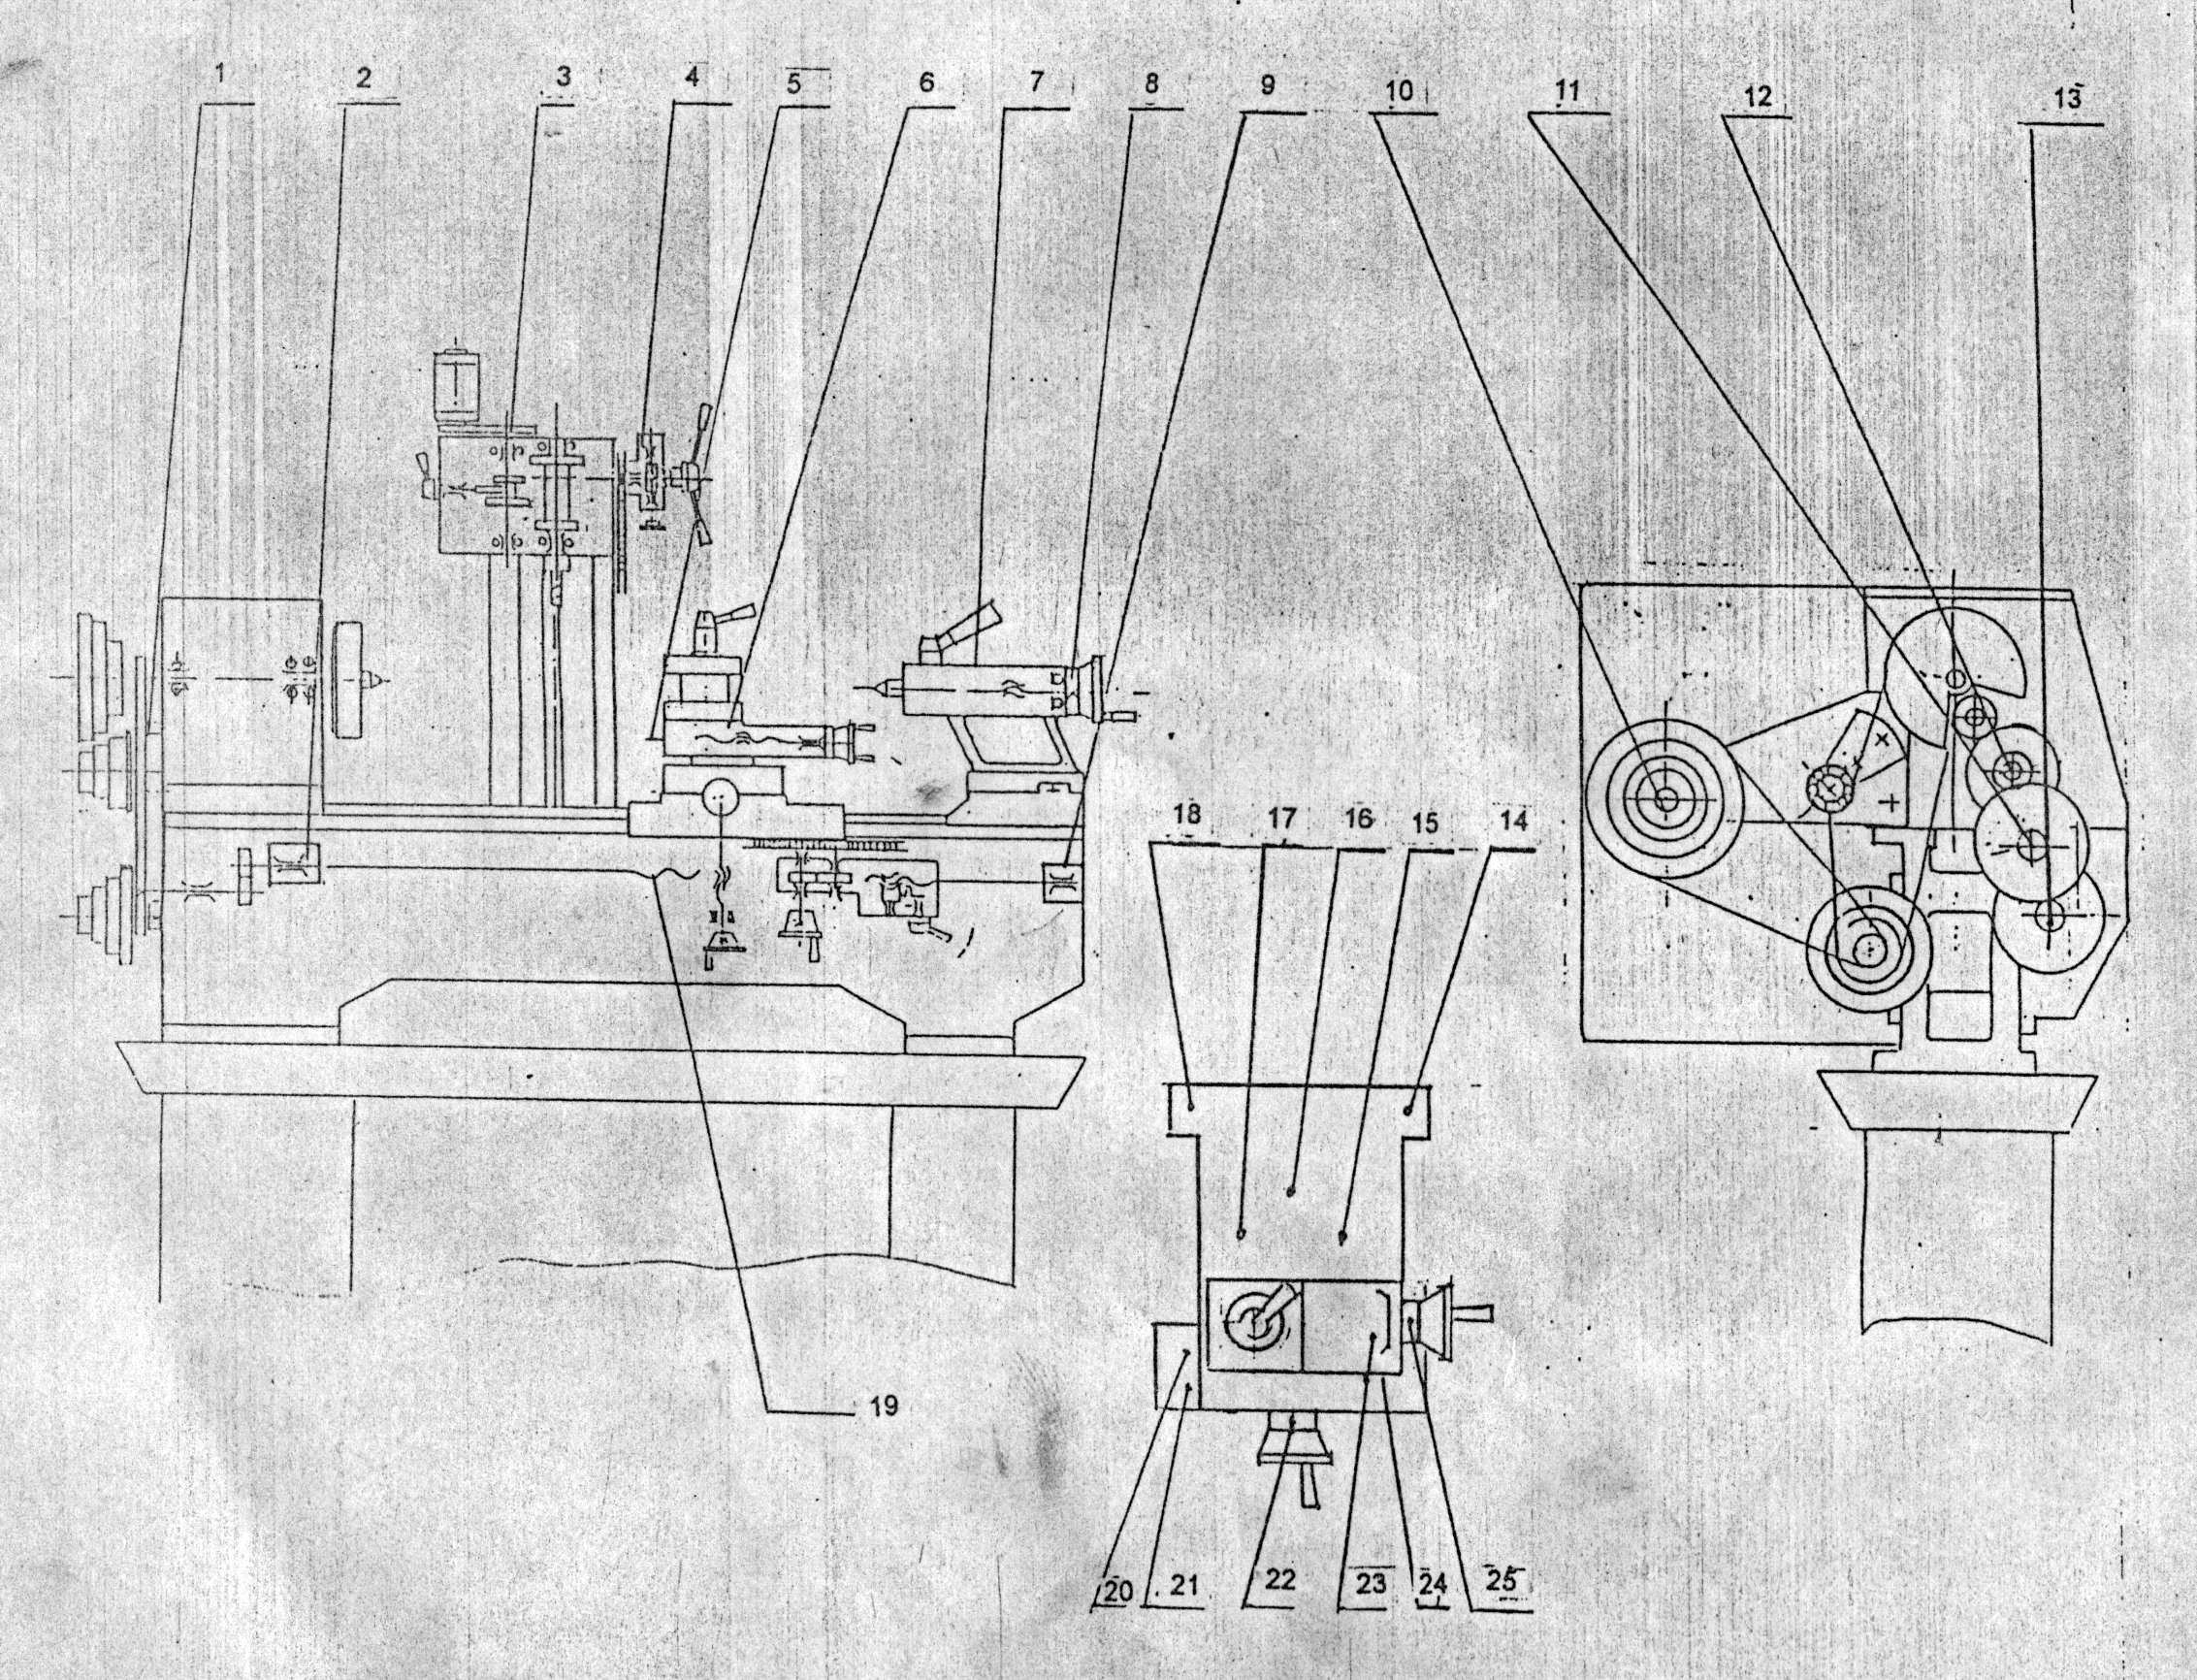
The headstock spindle and the feed system are driven by JZ 7134 single phase asymmetrical motor (AC) installed at the rear of the bed. Parts like the driving support and shaft are assembled on over plate 1535 attached to the headstock. The drive system can be exposed by opening the protecting cover of the motor. When the V-belt is connected to the spindle directly, the spindle will run at high speed, ie 620, 1000 or 2000 RPM. When the V-belt is connected to the synchronized counter pulley 1513 which is driven by the motor through a timing belt, the spindle will run at low speed, ie 125, 210 or 420 RPM. Thus resulting in six possible speeds of the spindle. The clockwise and counter-clockwise running of the machine is achieved through a switch in the control box.
The tension pulley of the driving belt is composed of two 101 singlerow annular ball bearings which is lubricated by white grease for less power consumption. This pulley is assembled on the fan support 1530 to be adjusted in two directions. If the belt gets loose, it can be retightened for proper operation through the tension pulley 1517 in the following manner: loosen bold 1532 on the fan support, tighten the V-belt to a proper extent and then retighten the bolt.
Different feeding speeds of the tool rest are obtained by engaging the gear on the rear of the spindle to change gears of different teeth in the change gear box to turn the spindle, and the closing the screw nut by means of lever on the apron, similarly, different cutting pitches can also be reached. When the headstock spindle runs in its normal direction, right threads are cut. If you need to cut left threads, just take the set of 40 tooth gear bolt component from the accessories and fix it under the spindle, engaging it to the original 40 tooth gear bolt component. The long lead screw 135 will then run in reverse direction to cut left threads.
See Component Drawing Number 1500 Motor & Pulley, Parts List of Motor & Pulley, Figure 1 Drive System, Parts List of Drive System.
| Number | Description | Qty |
|---|---|---|
| 1501 | Bolt M8×30 | 4 |
| 1502 | Washer 8 | 2 |
| 1503 | Motor | 1 |
| 1504 | Flat Key | 1 |
| 1505 | Check Ring | 1 |
| 1506 | Synchronized Drive Pulley | 1 |
| 1507 | Check Ring | 1 |
| 1508 | Motor Pulley | 1 |
| 1509 | Check Ring | 1 |
| 1510 | Screw M6×30 | 1 |
| 1511 | Oil Cup 6 | 1 |
| 1512 | Great Washer | 1 |
| 1513 | Synchronized Counter Pulley | 1 |
| 1514 | Slide Bearing | 1 |
| 1515 | Arm Shaft | 1 |
| 1516 | Bearing Arbor | 1 |
| 1517 | Tension Pulley | 1 |
| 1518 | Bearing 101 | 1 |
| 1519 | Tube Separator | 1 |
| 1520 | Bearing 101 | 1 |
| 1521 | Check Ring | 1 |
| 1522 | Check Ring | 1 |
| 1523 | Pivot | 1 |
| 1524 | Washer | 1 |
| 1525 | Washer 10 | 1 |
| 1526 | Nut M10 | 1 |
| 1527 | Check Ring | 1 |
| 1528 | Bolt M8×25 | 1 |
| 1529 | Washer 8 | 1 |
| 1530 | Fan Support | 1 |
| 1531 | Washer | 1 |
| 1532 | Screw M8×25 | 1 |
| 1533 | Bolt M10×25 | 1 |
| 1534 | Washer 10 | 1 |
| 1535 | Pulley Support | 1 |
| 1536 | Motor Cover | 1 |
| 1537 | Screw M6×12 | 3 |
| 1538 | Nut M12 | 1 |
| 1539 | Nut M12 | 1 |
| 1540 | Washer 12 | 1 |
| 1541 | Screw M3×6 | 4 |
| 1542 | Motor Cover | 1 |
| 1543 | Washer 10 | 4 |
| 1544 | Timing Belt M=1.5, Z=124, B=15 | 1 |
| 1545 | V-Belt L=737 | 1 |
| Number | Description | Qty |
|---|---|---|
| 1 | Nut Tr20×2 (left) | 1 |
| 2 | Gear | 1 |
| 3 | Small Gear Shaft | 1 |
| 4 | Saddle Lead Screw | 1 |
| 5 | Clearance Eliminating Nut | 1 |
| 6 | Rack | 1 |
| 7 | Small Gear Z:26 | 2 |
| 8 | Synchronized Drive Pulley | 1 |
| 9 | Change Gear Z:25 | 1 |
| 10 | Spindle Pulley | 1 |
| 11 | Bearing (60206) 62×30×16 | 1 |
| 12 | Bearing (36108) 68×40×15 | 2 |
| 13 | Long Lead Screw | 1 |
| 14 | Gear & Motor | 1 |
| 15 | Slide Double Join Gear | 1 |
| 16 | Gear Z:30 | 1 |
| 17 | Bearing 80101 | 2 |
| 18 | Fix Double Join Gear | 1 |
| 19 | Rack Z:108 | 1 |
| 20 | Shaft Gear Z:14 | 1 |
| 21 | Worm | 1 |
| 22 | Bevel Gear Z:29 | 1 |
| 23 | Handle Stock (with Gear) | 1 |
| 24 | Cutter Rest Revolving Disc | 1 |
| 25 | Cutter Rest Lead Screw | 1 |
| 27 | Tailstock Lead Screw | 1 |
| 28 | Tailstock Sleeve | 1 |
| 29 | Bearing (8101) 12×26×9 | 1 |
| 30 | Clinderial Pin 5×12 | 2 |
| 31 | Groove Plate | 1 |
| 32 | Synchronized Counter Pulley | 1 |
| 33 | Bearing (101) 12×28×8 | 2 |
| 34 | V-Belt 0~Type 762 | 1 |
| 35 | Intermediate Gear Z:40 | 1 |
| 36 | Change Gear Z:33 | 1 |
| 37 | Change Gear Z:80 | 1 |
| 38 | Change Gear Z:90 | 1 |
| 39 | Change Gear Z:90 | 1 |
| 40 | Motor JZ 7134/550W | 1 |
| 41 | Motor Pulley | 1 |
| 42 | Timing Belt Z:124 M:1.5 B:15 | 1 |
| 43 | Gear Shaft Z:17 | 1 |
See Component Drawing Number 100 Bed.
The drive lead screw 135 is set on the bed. The lead screw is driven by the spindle gear and the change gears in the change gear box. The apron is driven by the lead screw. Before leaving the factory, the moving accuracy of the screw 135 and the rack 132 against the guides has been finely adjusted against the technical specifications, no adjustment is necessary by the user,
After long usage, if excessive exial movement of the lead screw is found, the following steps can be taken:
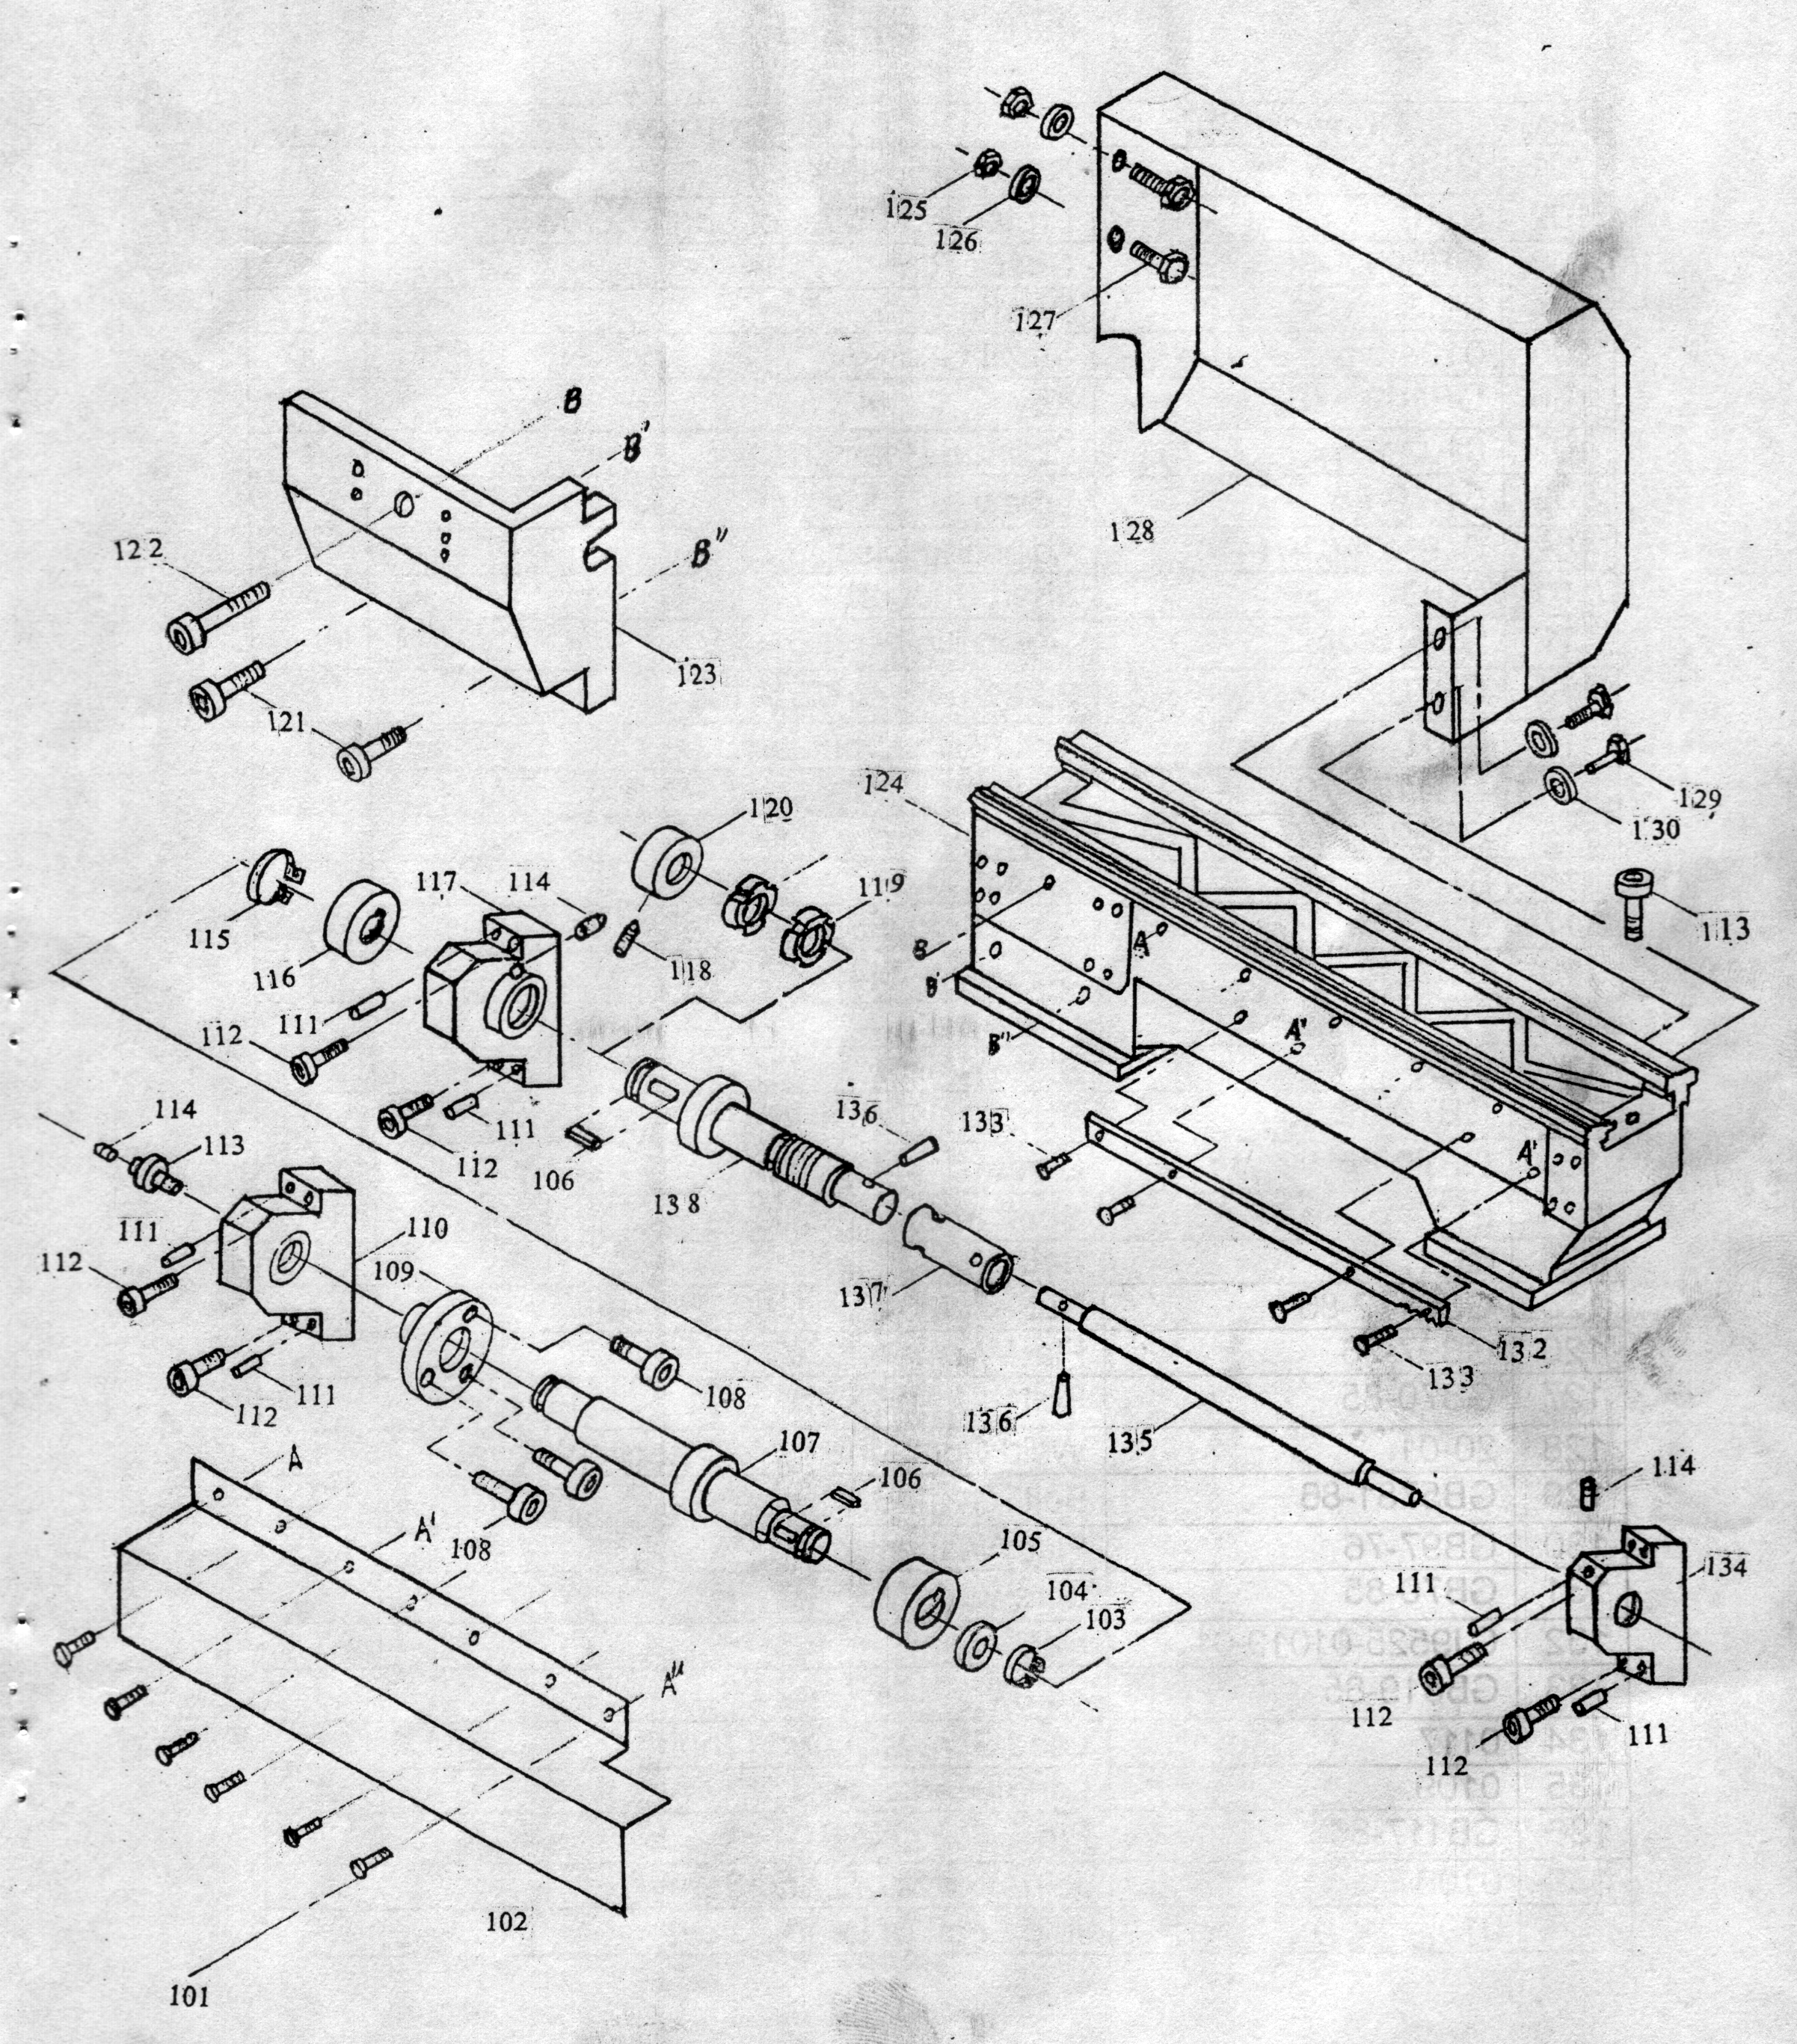
| Number | Description | Qty |
|---|---|---|
| 101 | Screw M5×8 | 7 |
| 102 | Protecting Cover of Lead Screw | 1 |
| 103 | Check Ring 14 | 1 |
| 104 | Washer | 1 |
| 105 | Small Gear | 1 |
| 106 | Key 4×8 | 2 |
| 107 | Change Gear Shaft | 1 |
| 108 | Screw M4×16 | 3 |
| 109 | Adjusting Disc | 1 |
| 110 | Shaft Support | 1 |
| 111 | Taper Pin ∅6×25 | 6 |
| 112 | Screw M5×16 | 6 |
| 113 | Bolt (with shoulder) | 1 |
| 114 | Oil Cup 6 | 3 |
| 115 | Check Ring 14 | 1 |
| 116 | Small Gear | 1 |
| 117 | Lead Screw Support (left) | 1 |
| 118 | Screw M4×8 | 1 |
| 119 | Circle Nut | 2 |
| 120 | Steel Washer | 1 |
| 121 | Screw M5×16 | 2 |
| 122 | Screw M6×60 | 1 |
| 123 | Shaft Protecting Cover | 1 |
| 124 | Bed | 1 |
| 125 | Nut M6 | 2 |
| 126 | Flat Washer 6 | 2 |
| 127 | Bolt M6×10 | 2 |
| 128 | Weld Component of Protecting Cover | 1 |
| 129 | Bolt M8×15 | 2 |
| 130 | Flat Washer 8 | 2 |
| 131 | Screw M8×25 | 1 |
| 132 | Rack | 1 |
| 133 | Screw M5×12 | 4 |
| 134 | Lead Screw Support (right) | 1 |
| 135 | Long Lead Screw | 1 |
| 136 | Pin ∅4×25 | 2 |
| 137 | Join Sleeve of Lead Screw | 1 |
| 138 | Join Shaft of Lead Screw | 1 |
See Component Drawing Number 200 Headstock.
The headstock is mainly composed of case, spindle, bearing, check ring, pulley, nut, etc. The clearance of the spindle bearing has been well adjusted before leaving the factory. When the machine has been used for long, its accuracy may reduce and there may be vibrations during cutting. The bearing can be adjusted in the following manner:
Loosen the outside Nut 209 and tighten the inside nut to limit the axial movement to 0 ~ 0.015mm. Then tighten both nuts. If the two nuts are tightened too tight, the spindle may overheat at high speed, but as long as the temperature does not exceed 50°C the spindle accuracy can be restored.
The chuck is fixed on the 3-jaw chuck support with three screw 903 and double-end bolts 902. Screw the double-end bolts through the chuck support into the spindle threaded holes, turn the rotatable spacer and let the small hole fall into 902 and then tighten nuts 901 and it is ready for operation.
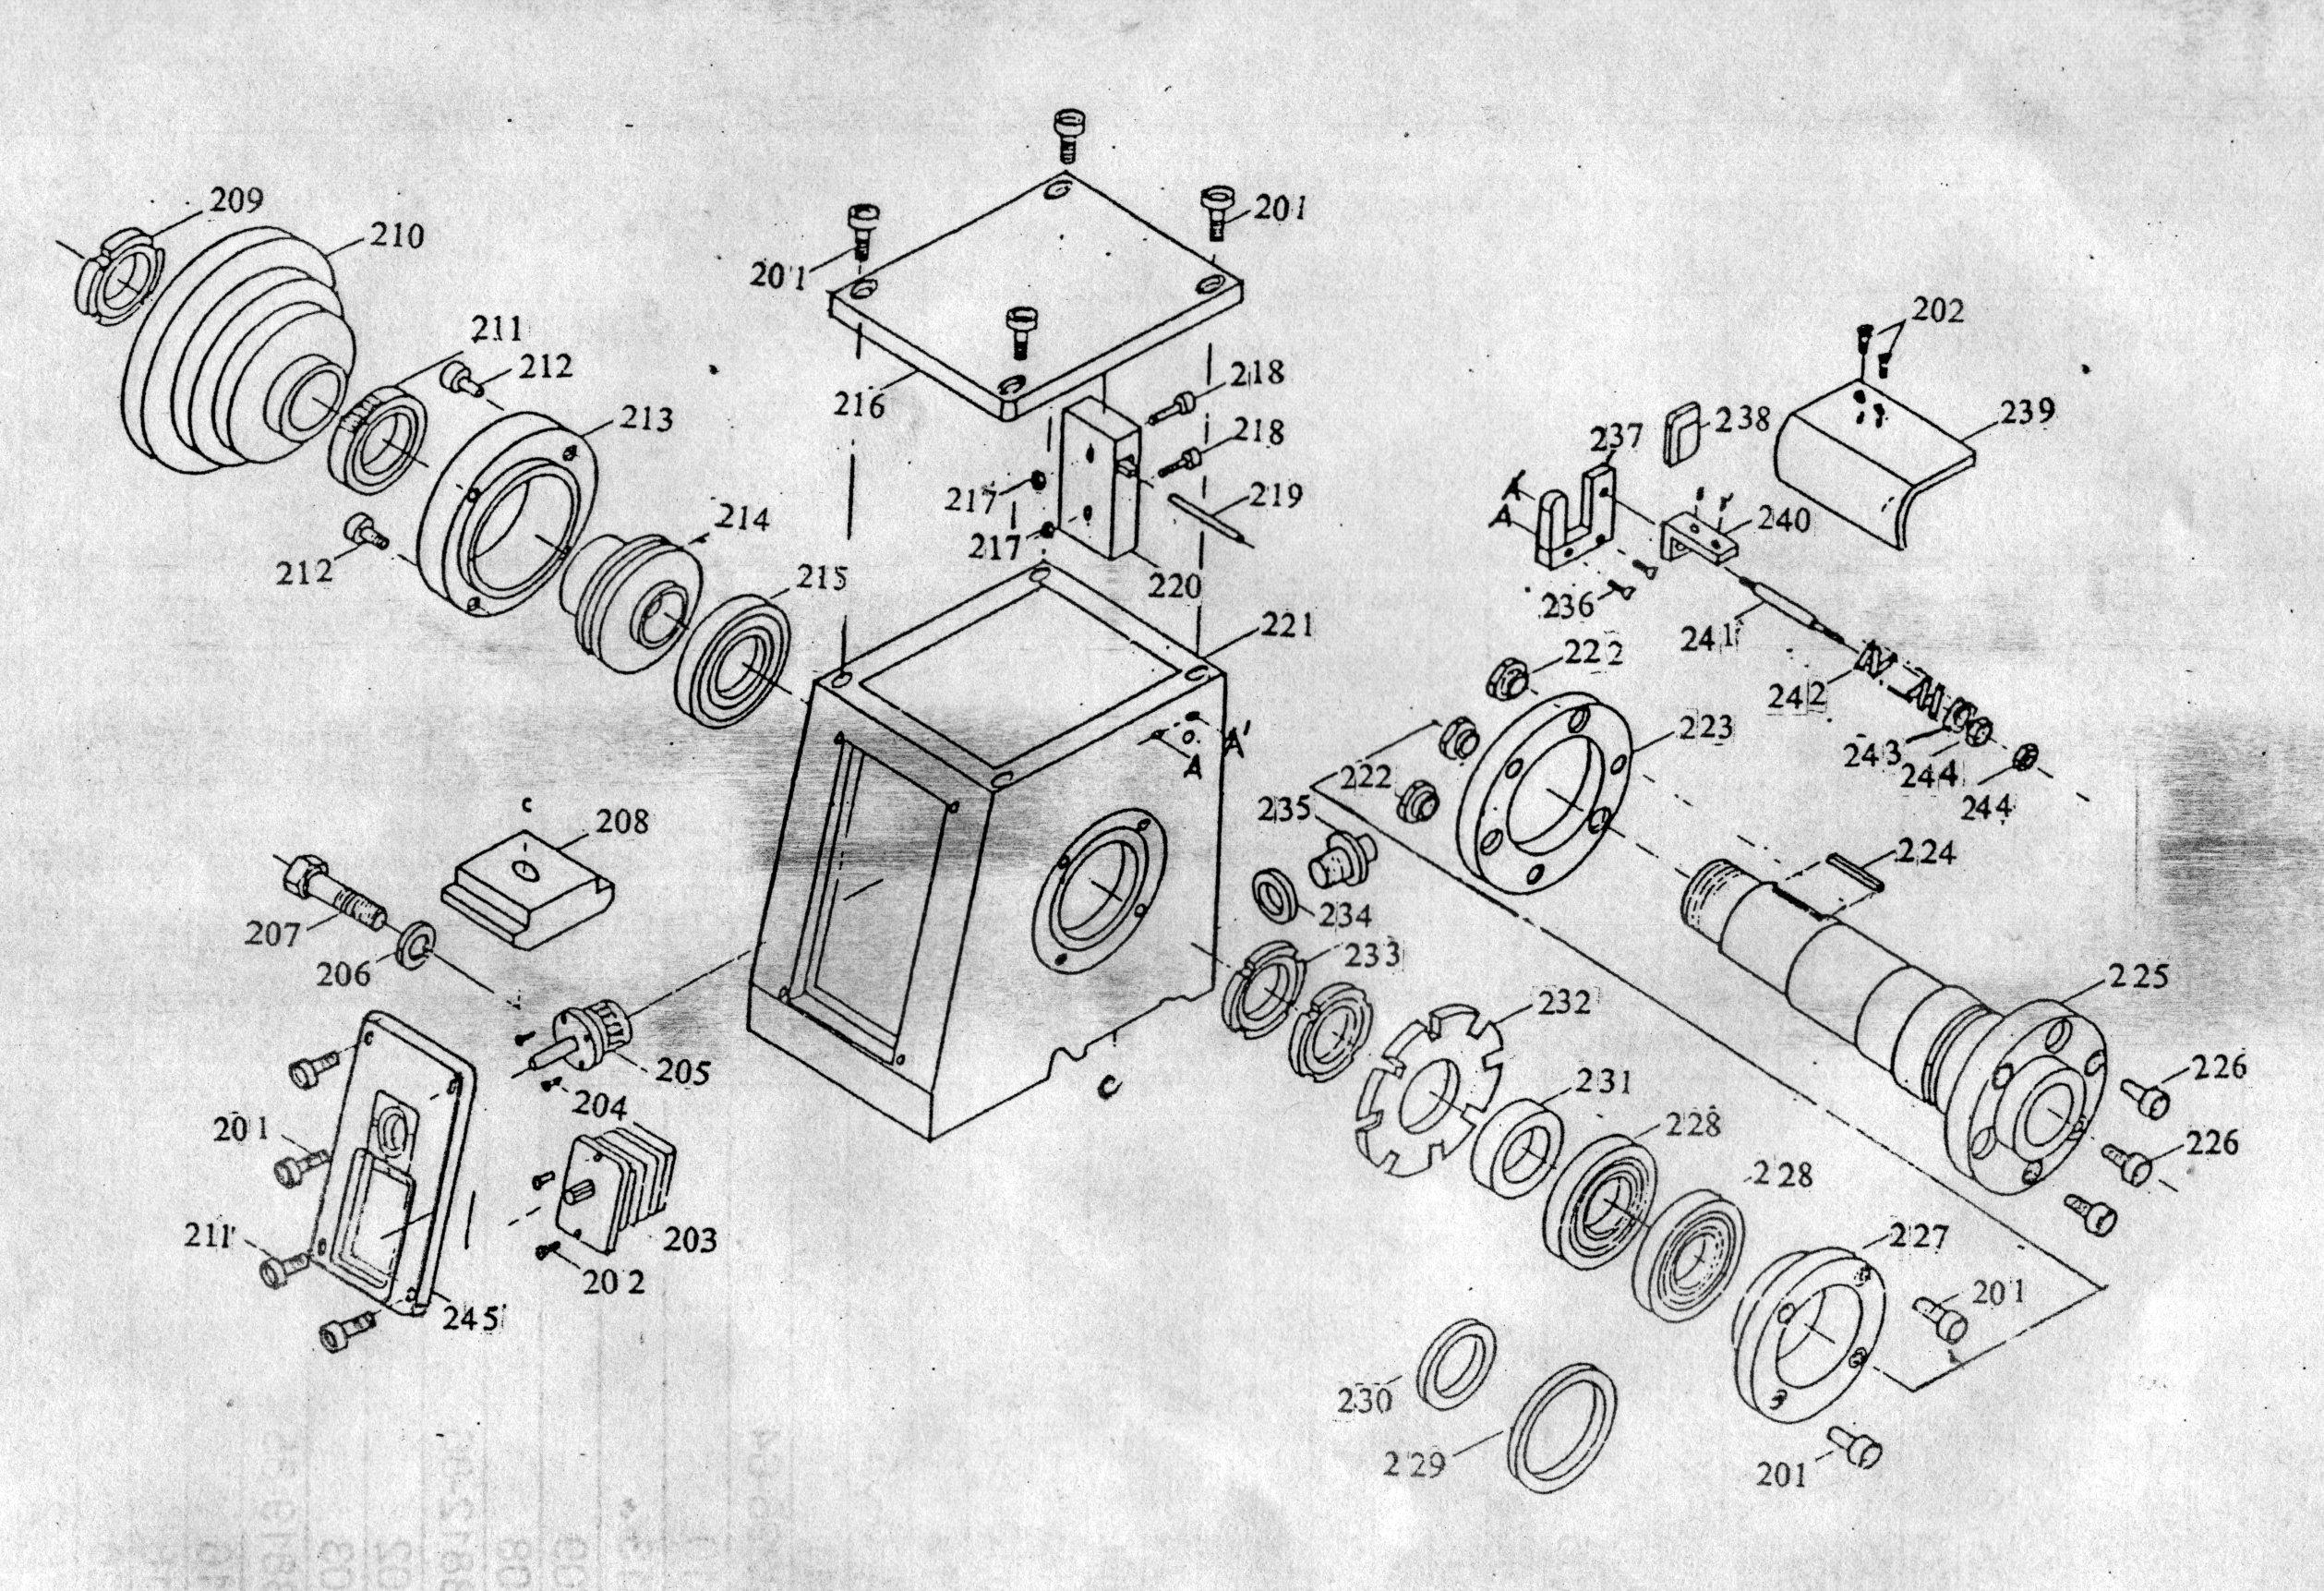
| Number | Description | Qty |
|---|---|---|
| 201 | Screw M5×15 | 12 |
| 202 | Screw M5×8 | 4 |
| 203 | Control Switch | 1 |
| 204 | Screw M4×10 | 4 |
| 205 | Reversing Switch | 1 |
| 206 | Spring Washer 10 | 2 |
| 207 | Bolt 10 | 2 |
| 208 | Spindle ox Fix Clamp Plate | 2 |
| 209 | Circle Not M27×1.5 | 2 |
| 210 | Spindle Pulley | 1 |
| 211 | Spindle Gear | 1 |
| 212 | Screw M5×20 | 4 |
| 213 | Back End Cover of Spindle | 1 |
| 214 | Oil Ring | 1 |
| 215 | Bearing (60206) | 1 |
| 216 | Spindle Box Cover | 1 |
| 217 | Nut M4 | 2 |
| 218 | Screw M4×35 | 2 |
| 219 | Limit Position Pin Shaft | 1 |
| 220 | Component of Micro Switch | 1 |
| 221 | Headstock Body | 1 |
| 222 | Position Sleeve | 3 |
| 223 | Rotatable Spacer | 1 |
| 224 | Flat Key 4×40 | 1 |
| 225 | Spindle | 1 |
| 226 | Screw M6×16 | 3 |
| 227 | Front Bearing Cover | 1 |
| 228 | Bearing (36108) 68×40×15 | 2 |
| 229 | Front Bearing Spacer (II) | 1 |
| 230 | Front Bearing Spacer (I) | 1 |
| 231 | Flat Washer | 1 |
| 232 | Fly Oil Plate | 1 |
| 233 | Circle Nut M36×1.5 | 2 |
| 234 | Flat Washer | 1 |
| 235 | Plug Screw | 1 |
| 236 | Screw M5×10 | 2 |
| 237 | Spindle Dust Cap Bracket | 1 |
| 238 | Limit Block Cap Bracket | 1 |
| 239 | Limit Block of Dust Cap | 1 |
| 240 | Support Strip | 1 |
| 241 | Small Shaft | 1 |
| 242 | Compress Spring | 1 |
| 243 | Washer | 2 |
| 244 | Nut M5 | 2 |
| 245 | Switch Liner | 1 |

| Number | Description | Qty |
|---|---|---|
| 901 | Nut M10 | 3 |
| 902 | Double-end Screw | 3 |
| 903 | Bolt M8×25 | 3 |
| 904 | Three Jaw Chuck | 1 |
See Component Drawing Number 300 Tailstock.
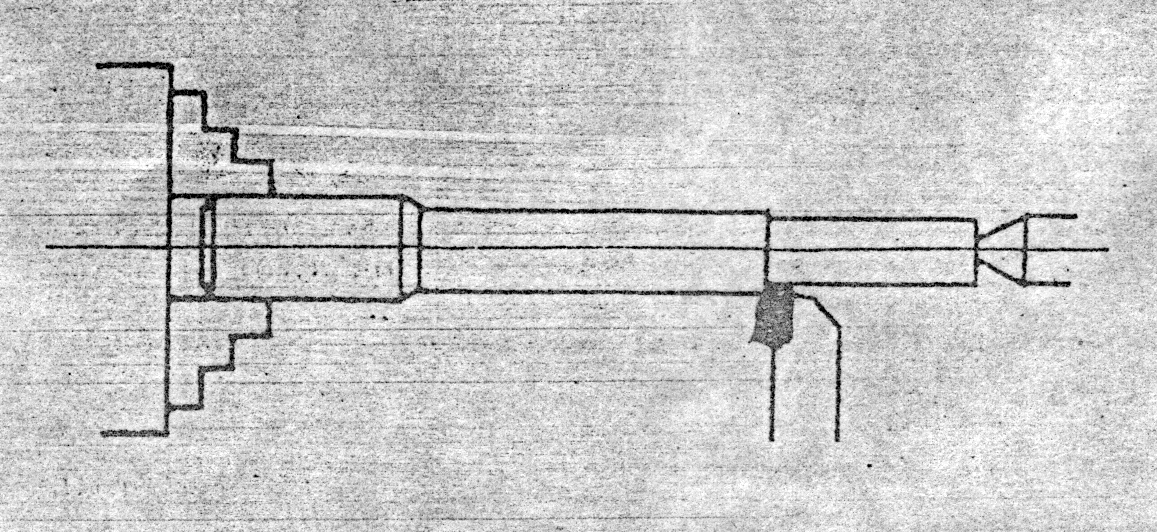
The tailstock is composed of the body, the tailstock lead screw, the baseplate and others. It moves along the guides on the bed. To conduct drilling, tapping, reaming, turning and other operations, move the tailstock to an appropriate position, fix it with nut 304 and move the tailstock sleeve back and forth with hand wheel 320.
The manufacturing accuracy of the tailstock is maintained within allowable tolerance. “0” line is cut on both Bed 305 and Baseplate 326 for alignment. If any deviation of the tailstock axial line is needed, the following steps should be taken:
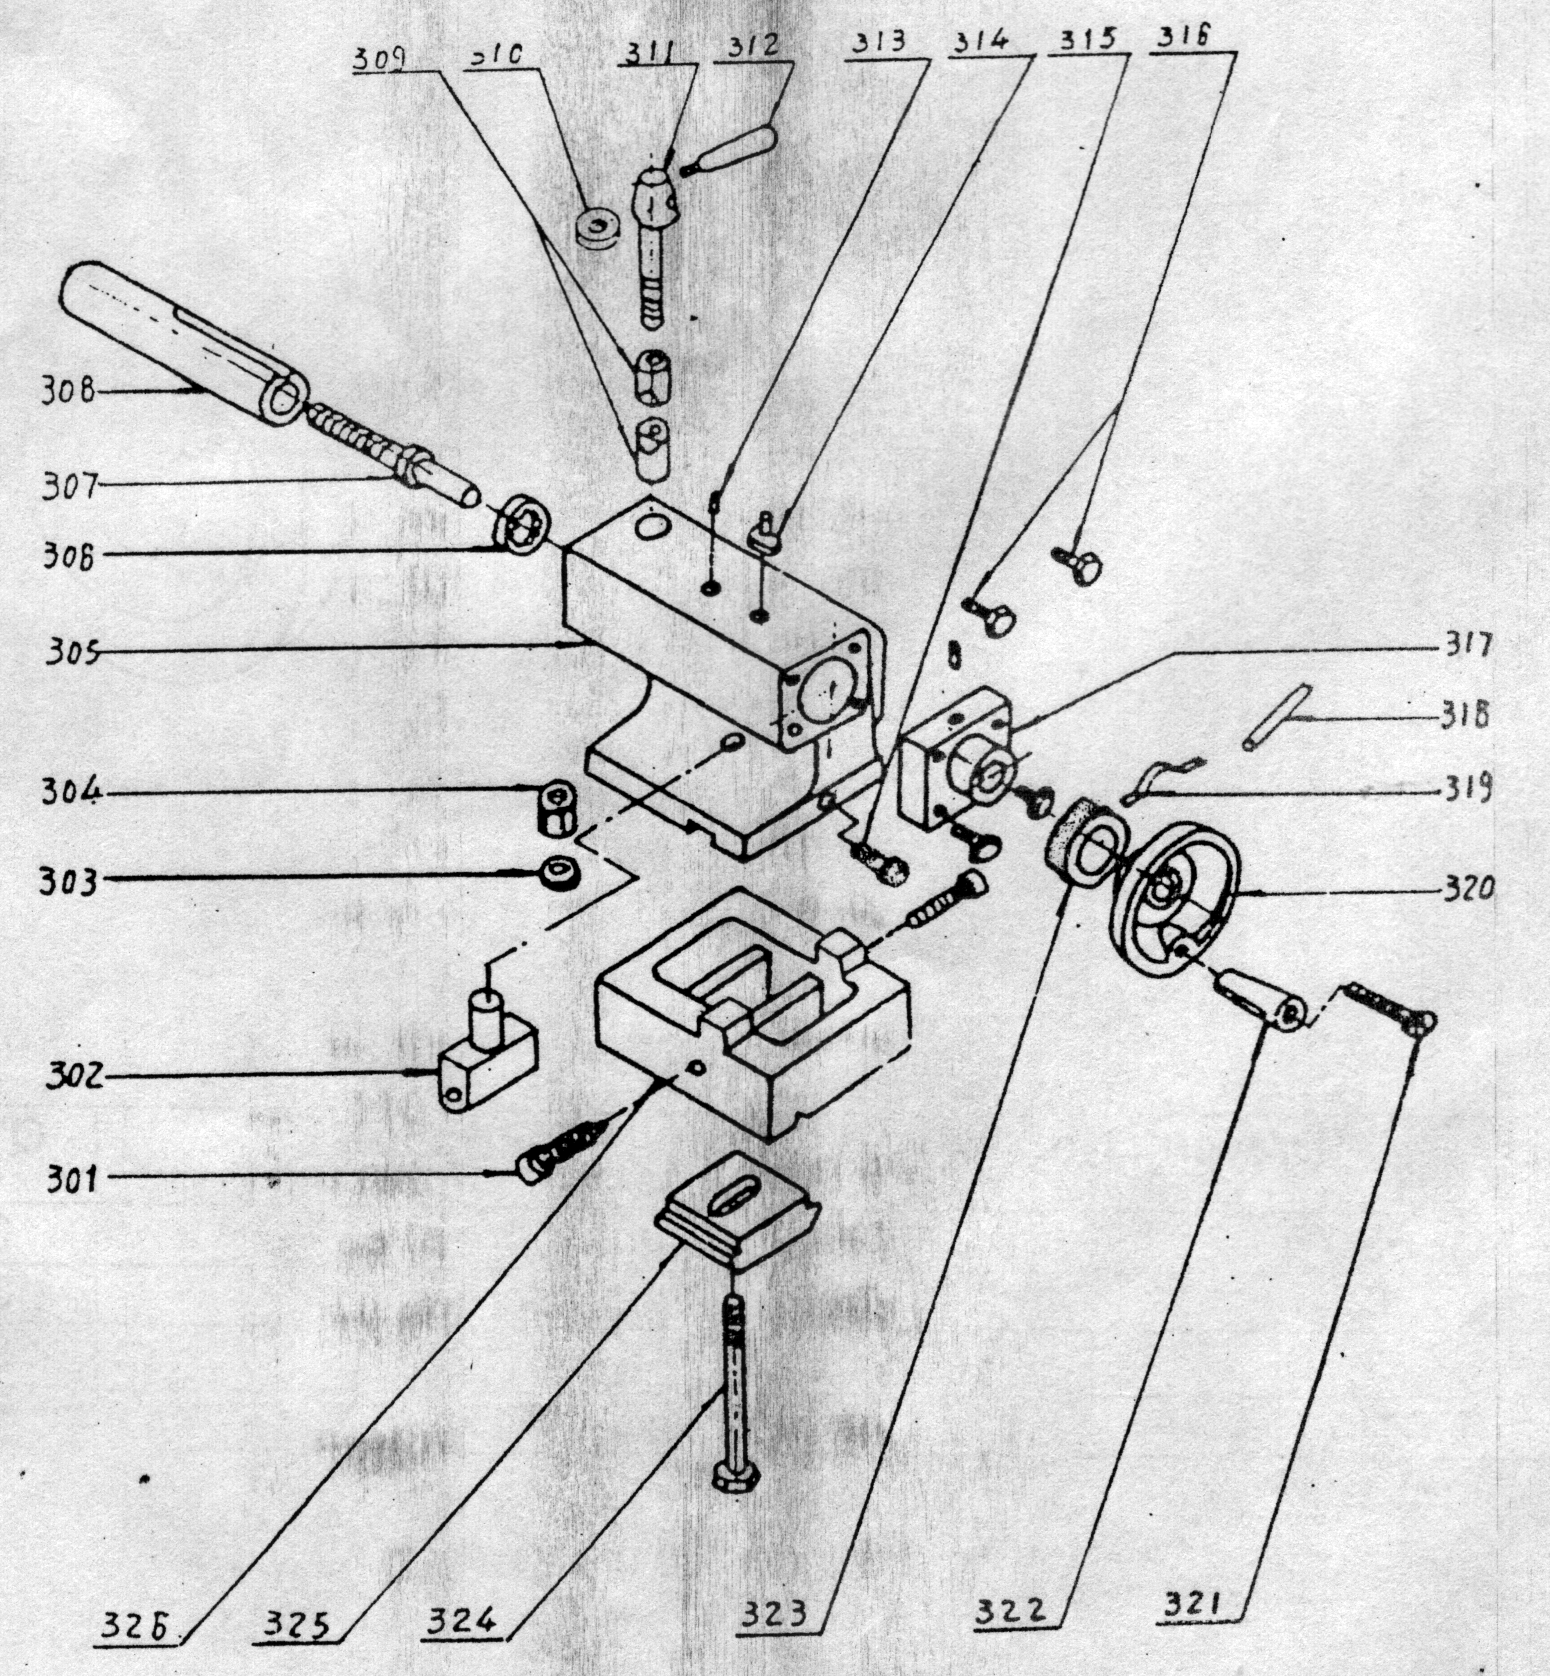
| Number | Description | Qty |
|---|---|---|
| 301 | Screw M8×30 | 2 |
| 302 | Nut | 1 |
| 303 | Washer B12 | 1 |
| 304 | Nut M12 | 1 |
| 305 | Tailstock Body | 1 |
| 306 | Single Row Radial Ball Bearing 12×26×29 | 1 |
| 307 | Tailstock Leadscrew | 1 |
| 308 | Tailstock Sleeve | 1 |
| 309 | Tubular Clamp | 1 |
| 310 | Washer M8 | 1 |
| 311 | Bolt | 1 |
| 312 | Handle | 1 |
| 313 | Force Feed Oil Cup | 2 |
| 314 | T-type Flat Key | 1 |
| 315 | Screw M6×16 | 1 |
| 316 | Screw M5×16 | 4 |
| 317 | Tailstock End Cover | 1 |
| 318 | Cylinder Pin 4×30 | 1 |
| 319 | Spring Bow | 1 |
| 320 | Handwheel | 1 |
| 321 | Handle Bolt | 1 |
| 322 | Handle Sleeve | 1 |
| 323 | Index Ring | 1 |
| 324 | Bolt M12×100 | 1 |
| 325 | Tailstock Clamp Plate | 1 |
| 326 | Base | 1 |
See Component Drawing Number 400 Cutter Rest, Component Drawing Number 500 Saddle.
The cutter rest and the saddle are connected and composed mainly of the carriage, screw, pad rion, square cutter rest, and indexed base. Its longitudinal and transverse movement is possible both mechanically and manually. The cutter rest can revolve 60° to left or right. There is an index ring on the handle which can be used to cut cylinder, cone, and flat surfaces of relatively high accuracy. However after much usage the swallow-tail guide of the saddle, the carriage of the cutter rest and the clamp plate of the saddle may cause excessive wear of the bed guides, so may the saddle leadscrew to the nut, thus lowering the cutting accuracy. To eliminate the excessive clearance, adjust as follows:
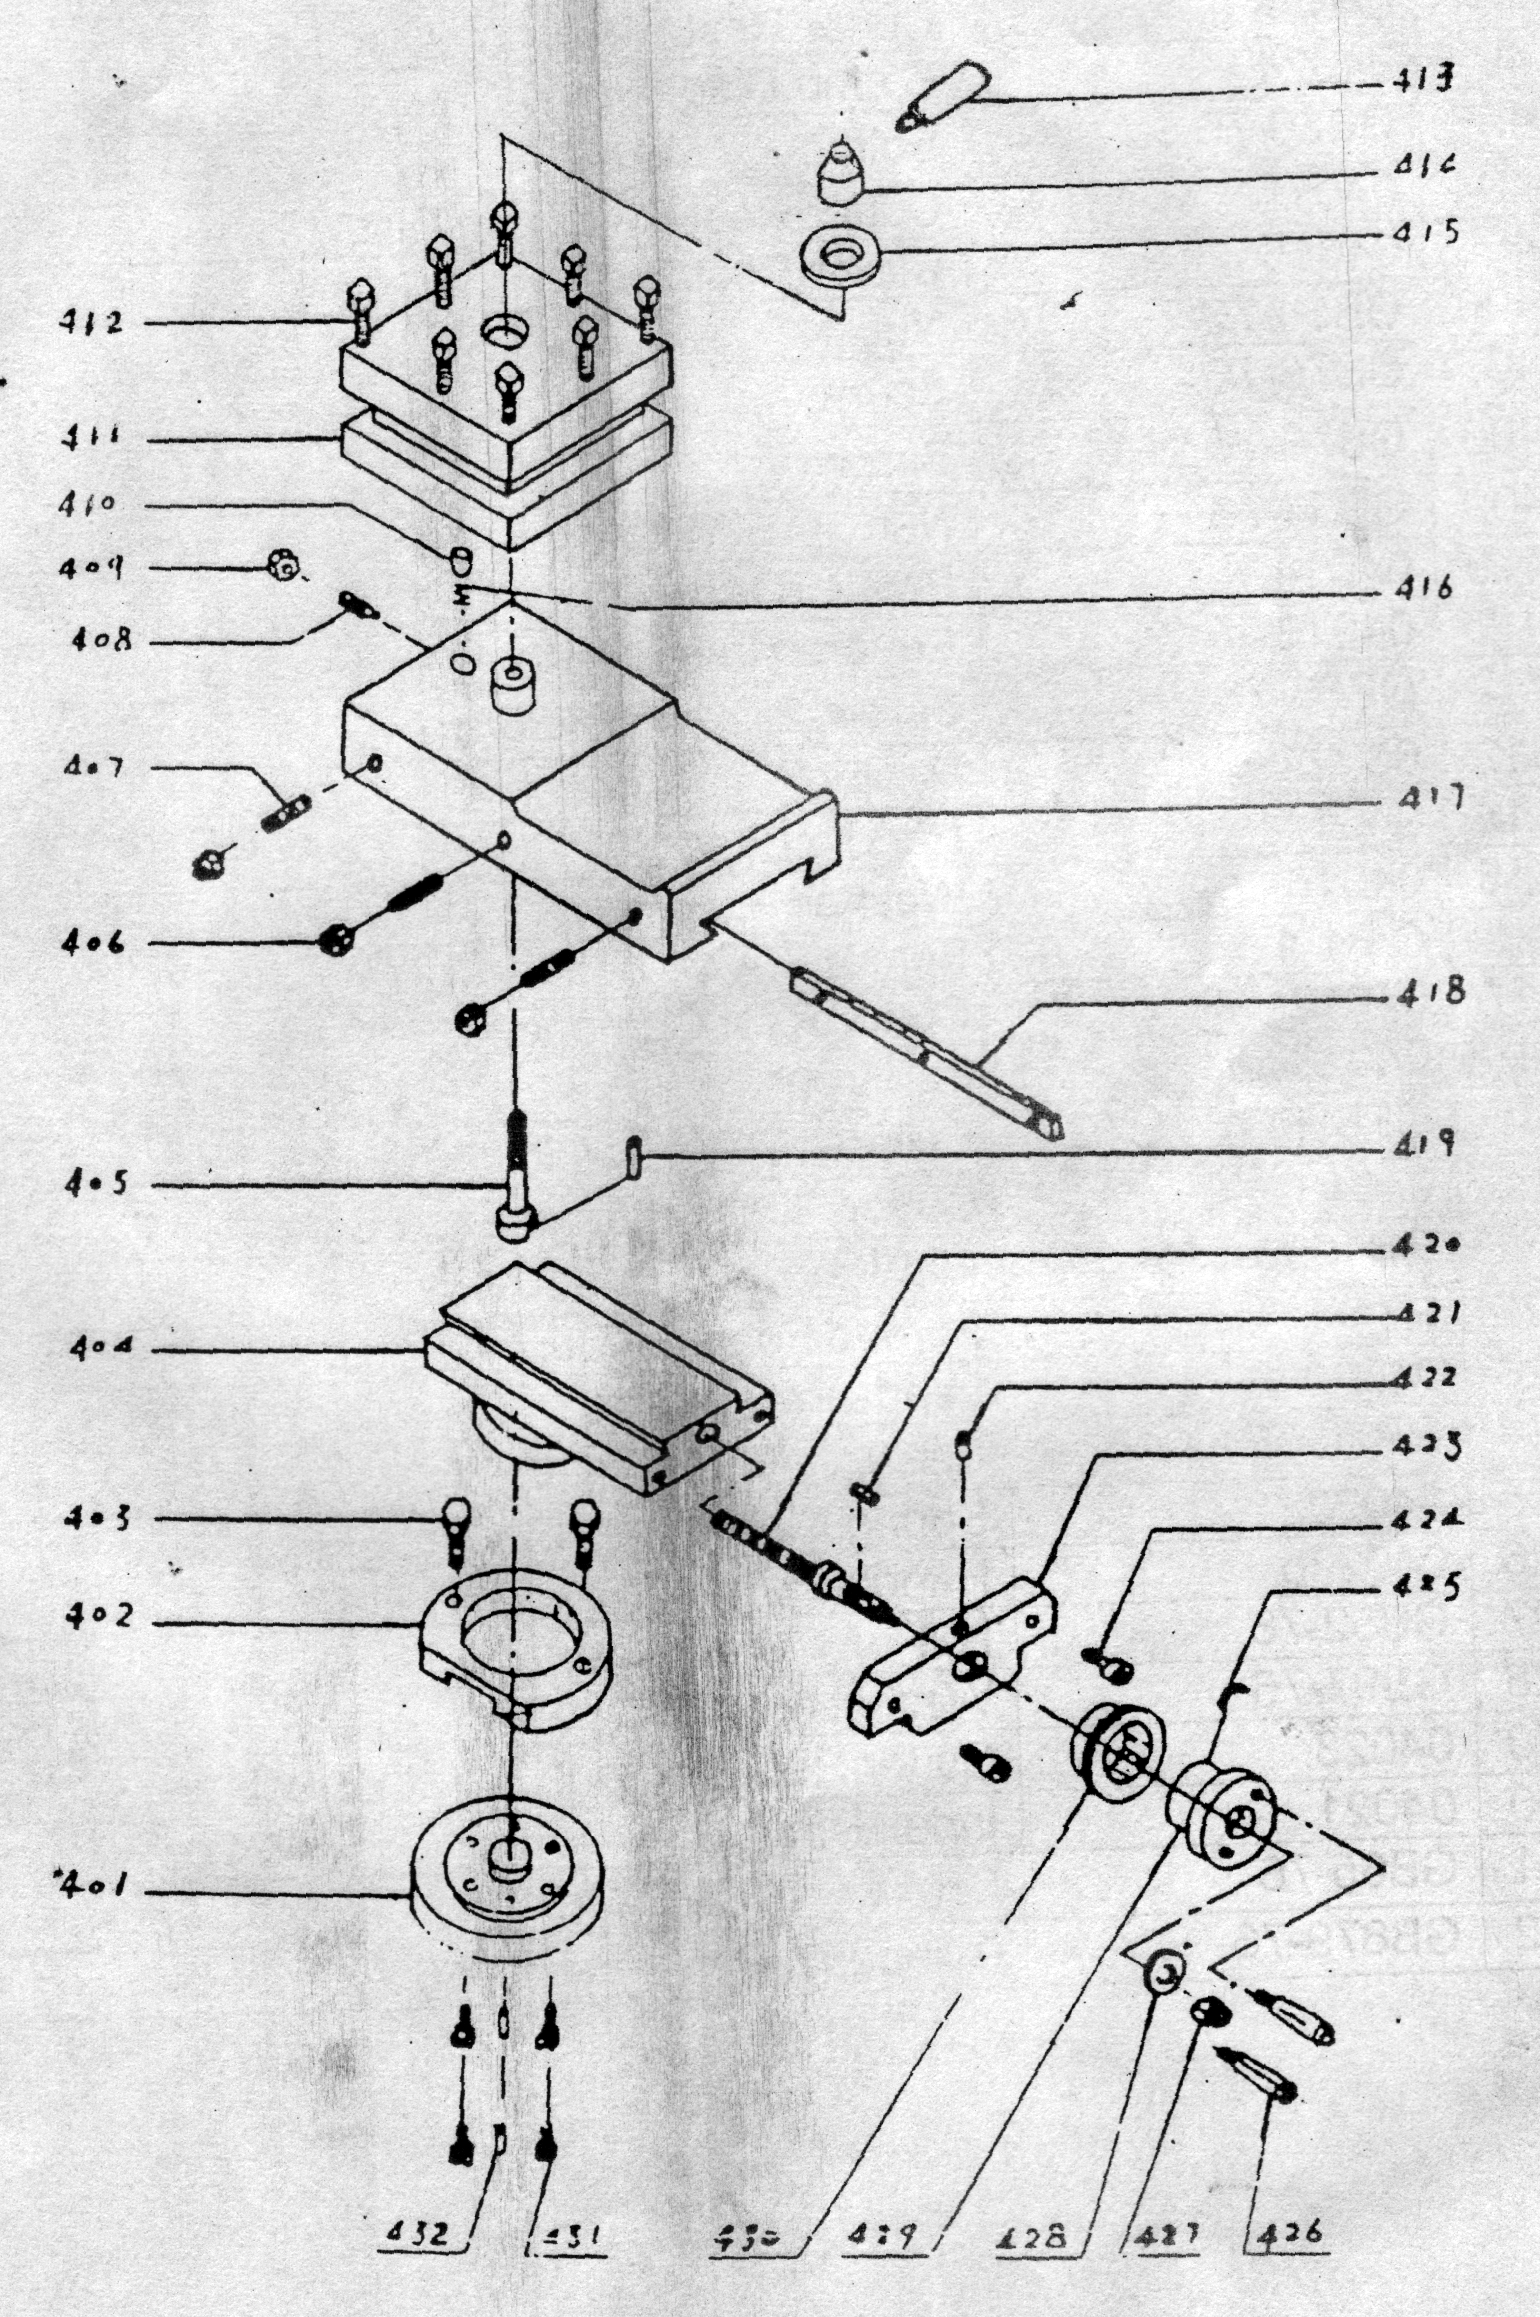
| Number | Description | Qty |
|---|---|---|
| 401 | Cutter Rest Revolving Disc Base | 1 |
| 402 | Clamp Disc | 1 |
| 403 | Bolt M8×20 | 2 |
| 404 | Cutter Rest Revolving Disc | 1 |
| 405 | Cutter Rest Bolt | 1 |
| 406 | Nut M4 | 3 |
| 407 | Screw M4×20 | 3 |
| 408 | Screw M4×12 | 1 |
| 409 | Nut M4 | 1 |
| 410 | Position Pin | 1 |
| 411 | Square Cutter Rest | 1 |
| 412 | Screw M8×25 | 8 |
| 413 | Handle | 1 |
| 414 | Handle Base | 1 |
| 415 | Washer | 1 |
| 416 | Spring | 1 |
| 417 | Cutter Rest Carriage | 1 |
| 418 | Pad Iron | 1 |
| 419 | Cylinder Pin 3×10 | 1 |
| 420 | Cutter Rest Carriage Leadscrew | 1 |
| 421 | Flat Key 3×10 | 1 |
| 422 | Forced Feed Oil Cup 6 | 2 |
| 423 | Leadscrew Support | 1 |
| 424 | Screw M5×16 | 2 |
| 425 | Spring Plate | 1 |
| 426 | Handle | 2 |
| 427 | Nut M8 | 1 |
| 428 | Washer B8 | 1 |
| 429 | Cutter Rest Carriage Hand Wheel | 1 |
| 430 | Index Ring | 1 |
| 431 | Screw M6×16 | 4 |
| 432 | Cylinder Pin 4×16 | 2 |
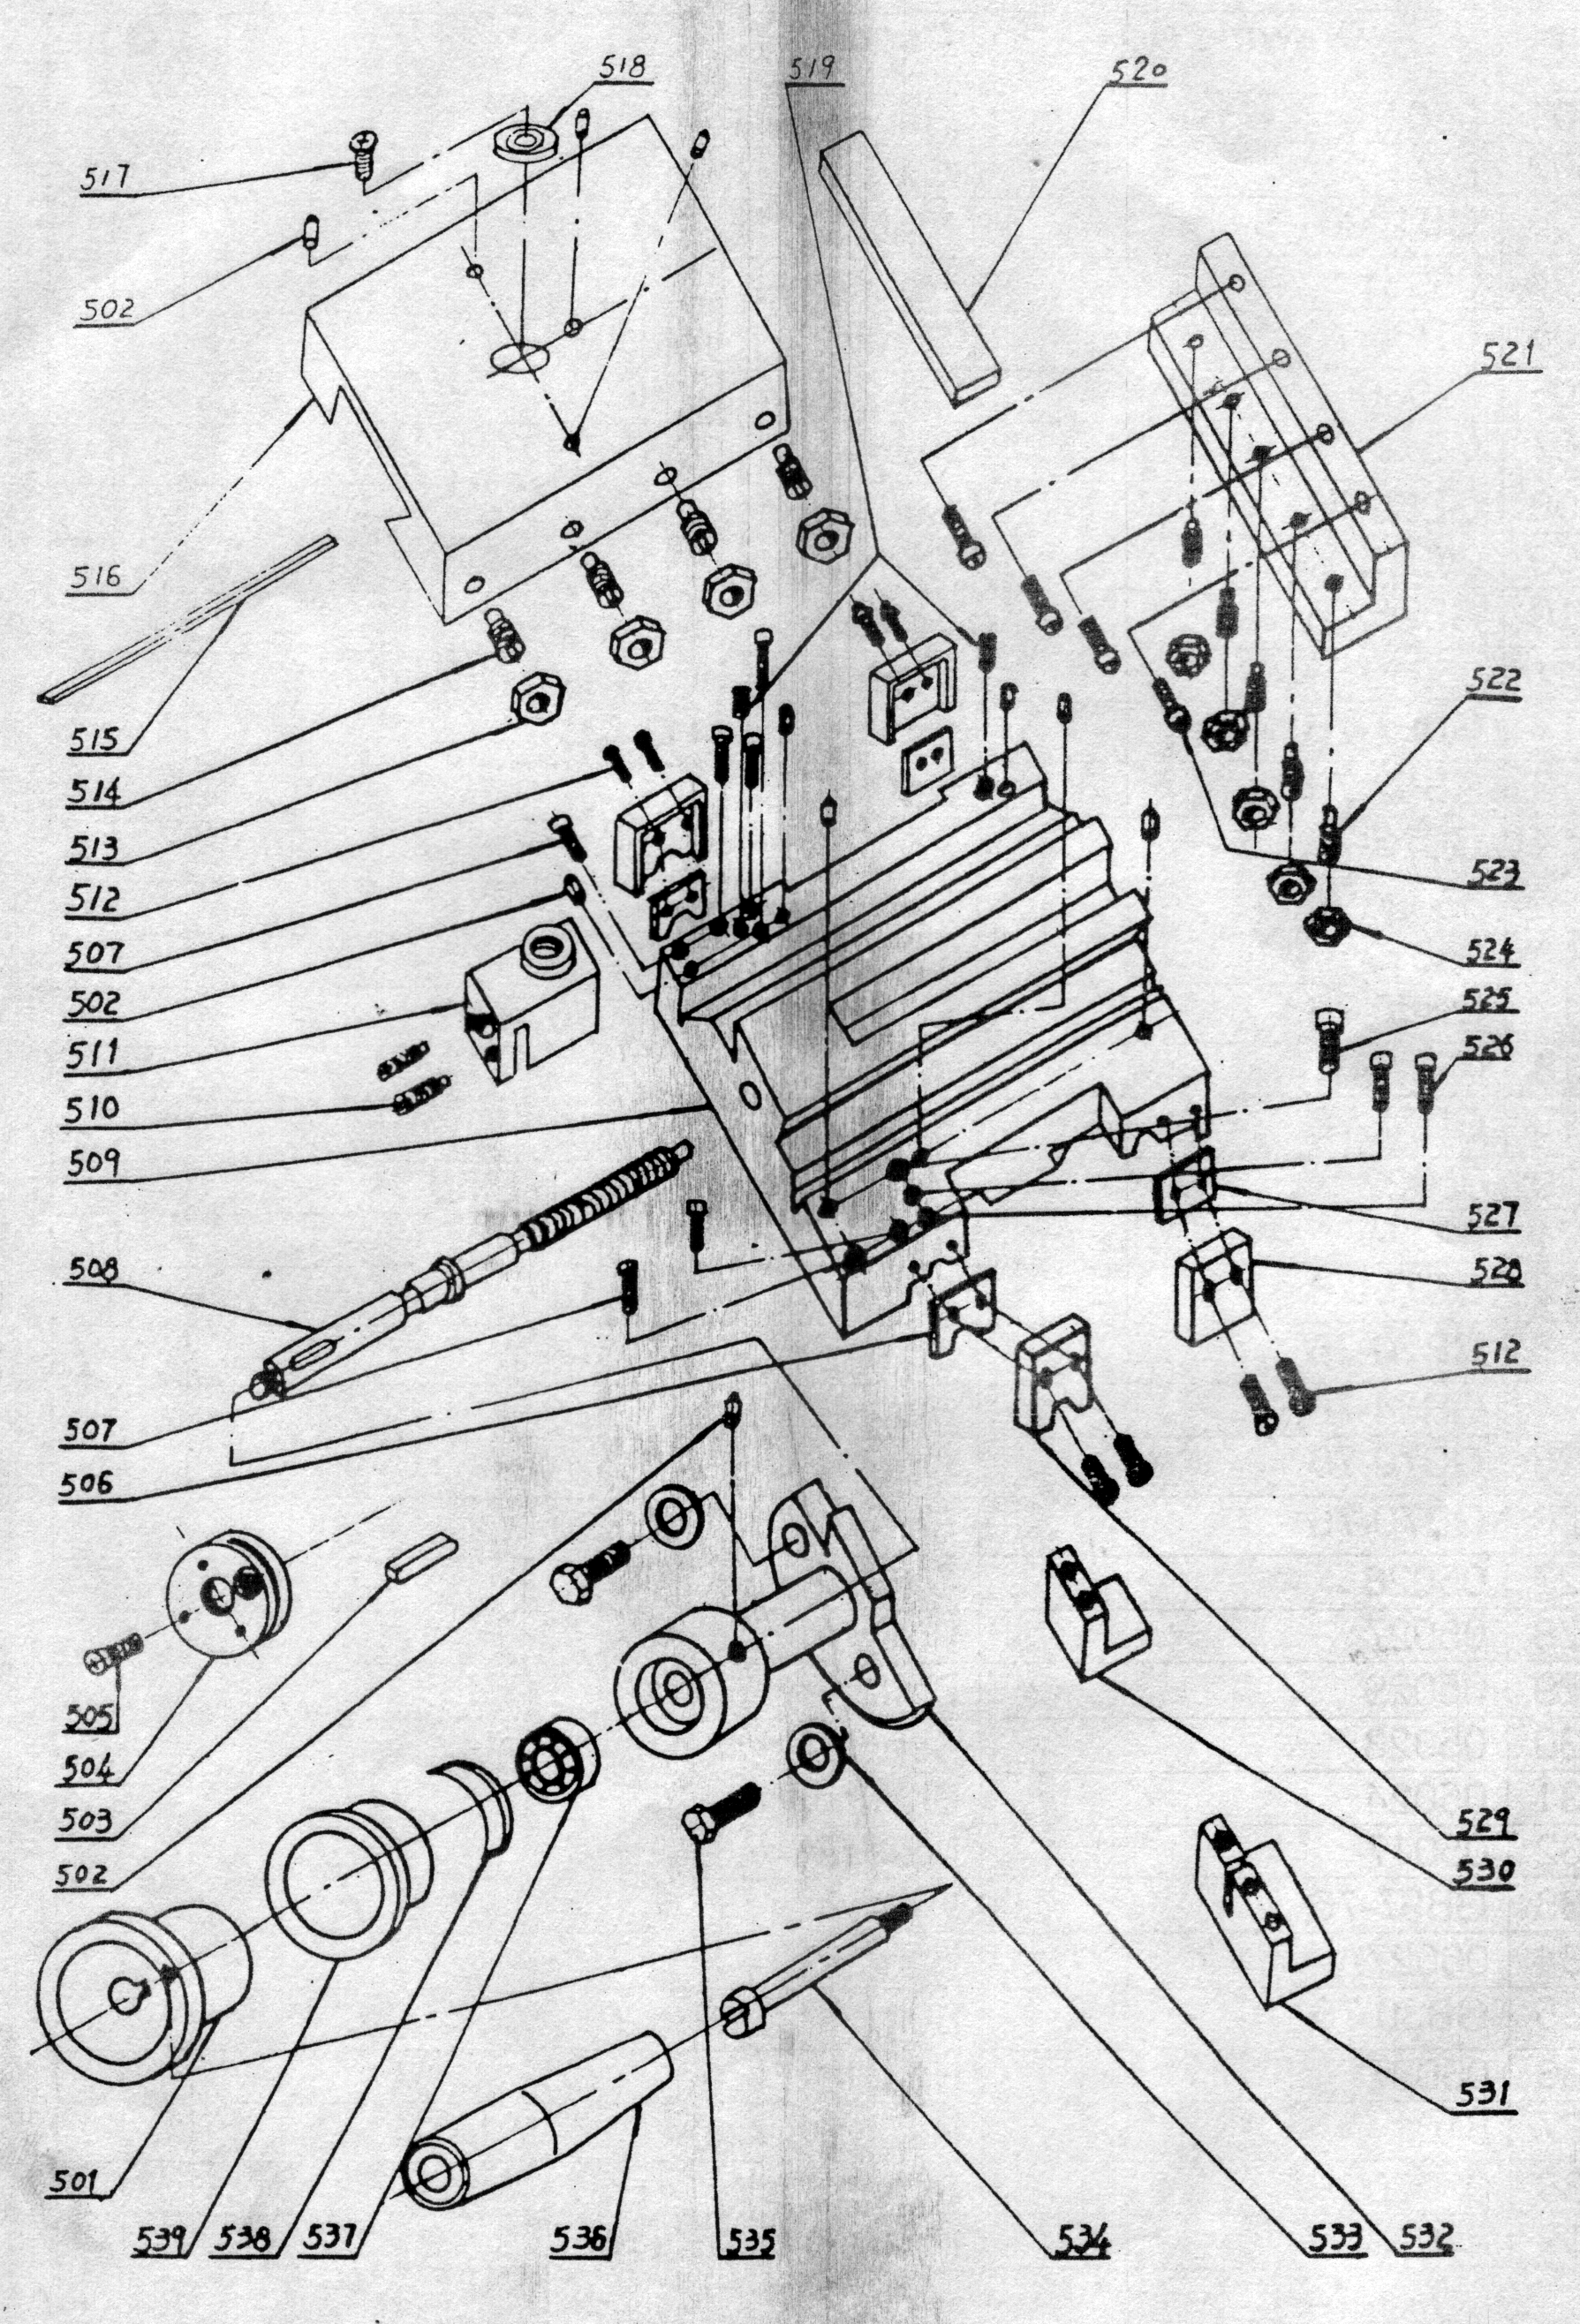
| Number | Description | Qty |
|---|---|---|
| 501 | Handwheel | 1 |
| 502 | Oil Cup 6 | 10 |
| 503 | Flat Key 4×12 | 1 |
| 504 | Round Nut | 1 |
| 505 | Screw M3×6 | 1 |
| 506 | Oil Stopping Felt | 2 |
| 507 | Screw M6×35 | 4 |
| 508 | Saddle Leadscrew | 1 |
| 509 | Saddle | 1 |
| 510 | Screw M3×12 | 2 |
| 511 | Clearance Eliminating Nut | 1 |
| 512 | Screw M3×12 | 8 |
| 513 | Nut M5 | 4 |
| 514 | Screw M5×25 | 4 |
| 515 | Pad Iron | 1 |
| 516 | Cross Slide | 1 |
| 517 | Screw M5×10 | 1 |
| 518 | Washer | 1 |
| 519 | Screw M8×10 | 2 |
| 520 | Rear Clamp Plate Gib Strip | 1 |
| 521 | Saddle Rear Clamp Plate | 1 |
| 522 | Screw M4×16 | 5 |
| 523 | Screw M5×16 | 4 |
| 524 | Nut M4 | 5 |
| 525 | Screw M8×20 | 1 |
| 526 | Screw M5×16 | 4 |
| 527 | Oil Stopping Felt | 2 |
| 528 | Protecting Panel | 2 |
| 529 | Protecting Panel | 2 |
| 530 | Saddle Front Clamp Plate | 1 |
| 531 | Braking Plate | 1 |
| 532 | Leadscrew Support | 1 |
| 533 | Washer 6 | 2 |
| 534 | Handle Bolt | 1 |
| 535 | Bolt M6×20 | 2 |
| 536 | Handle Sleeve | 1 |
| 537 | Rolling Bearing 12×26×9 | 1 |
| 538 | Spring Plate | 1 |
| 539 | Index Ring | 1 |
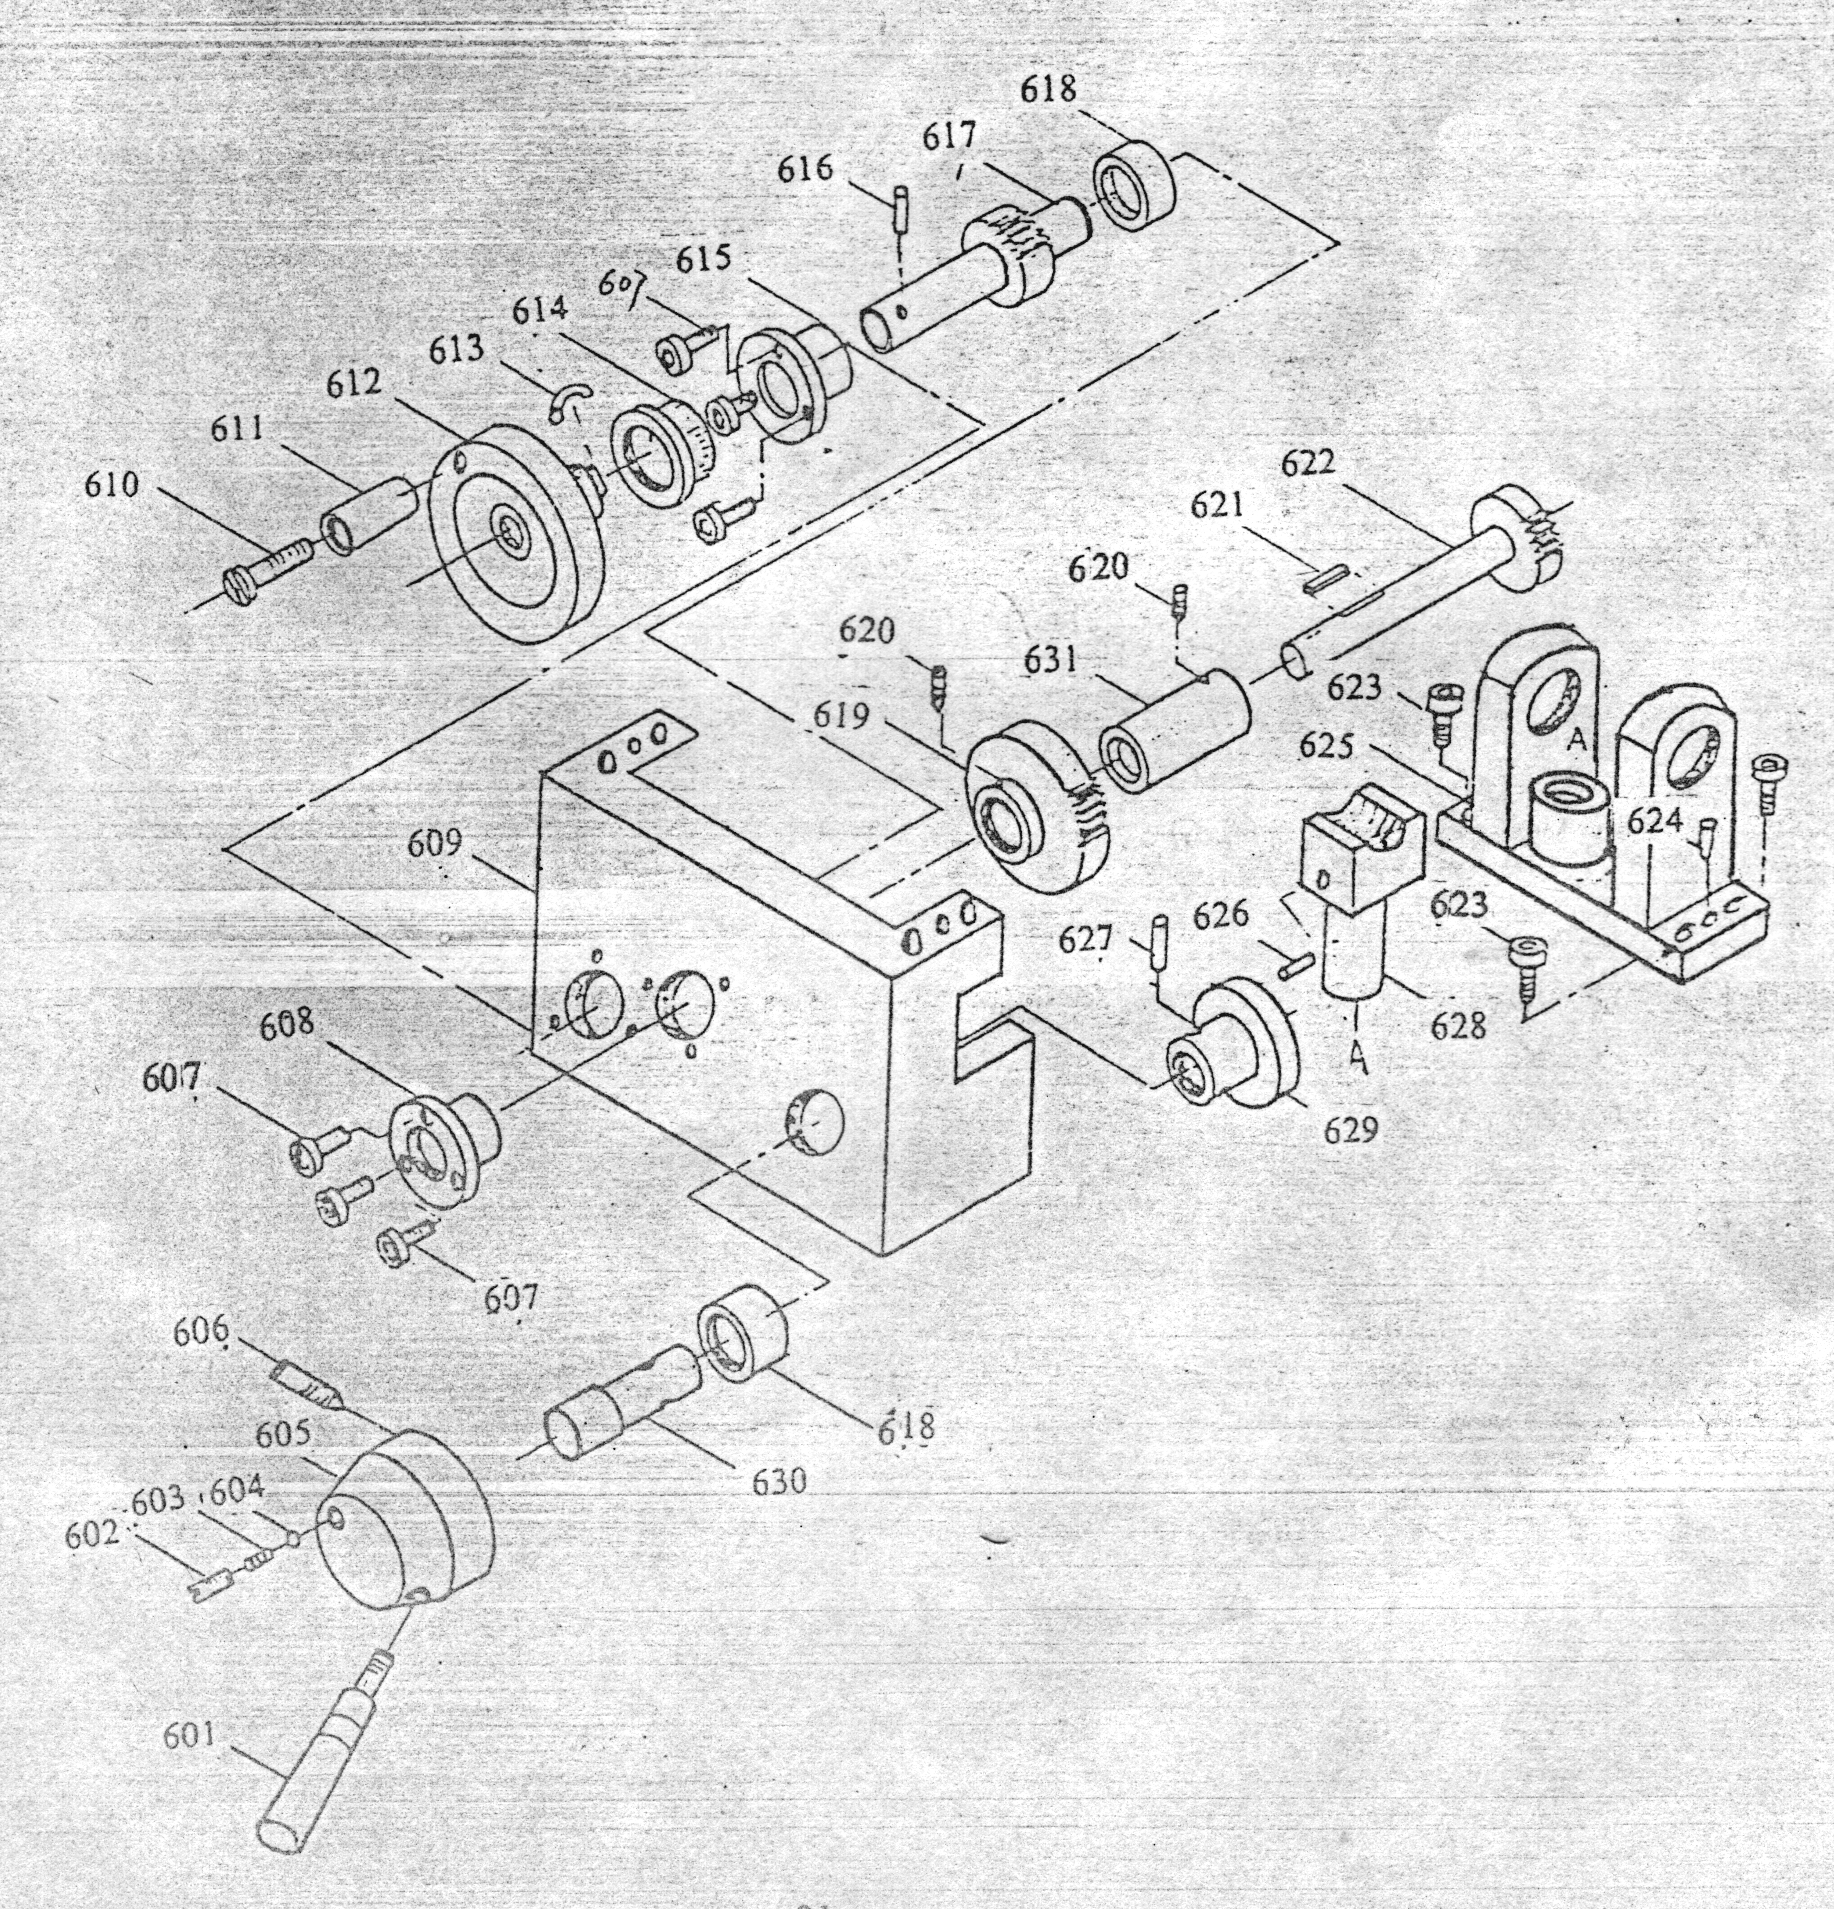
See Component Drawing Number 600 Apron.
The Apron is the longitudinal drive component of the cutter rest, operable both mechanically or manually. It is composed of the case, the gears, shafts, the leadscrew nut and the operating lever.
To start cutting, press the handle 601 down about 45°, the leadscrew nut will engage the long leadscrew as a result of the revolving. The cutter rest is moved forward. The moving speed of the cutter rest is preselected in accordance with the gear change table when cutting ends, pull back the leadscrew nut lever and push its handwheel 612 and return the cutter rest to the original position manually. For the sake of safety pull out this handwheel when feeding is done mechanically.
| Number | Description | Qty |
|---|---|---|
| 601 | Handle | 1 |
| 602 | Screw M6×10 | 1 |
| 603 | Spring 0.7×4×25 | 1 |
| 604 | Steel Ball ∅5 | 1 |
| 605 | Positioning Handle Stock | 1 |
| 606 | Screw M6×20 | 1 |
| 607 | Screw M4×10 | 6 |
| 608 | Flanged Shaft Sleeve | 1 |
| 609 | Apron Body | 1 |
| 610 | Handle Bolt | 1 |
| 611 | Handle Sleeve | 1 |
| 612 | Handwheel | 1 |
| 613 | Spring Plate | 1 |
| 614 | Index Ring | 1 |
| 615 | Small Flanged Shaft Sleeve | 1 |
| 616 | Spring Column Pin 4×30 | 1 |
| 617 | Small Gear Shaft | 1 |
| 618 | Shaft Sleeve | 2 |
| 619 | Gear | 1 |
| 620 | Screw M4×8 | 2 |
| 621 | Key 5×10 | 1 |
| 622 | Gear Shaft | 1 |
| 623 | Screw M5×15 | 4 |
| 624 | Taper Pin 4×15 | 2 |
| 625 | Nut Stock | 1 |
| 626 | Cylindrical Pin 5×12 | 1 |
| 627 | Pin 3×20 | 1 |
| 628 | Nut | 1 |
| 629 | Slotted Disc | 1 |
| 630 | Rotating Shaft | 1 |
| 631 | Shaft Sleeve | 1 |
See Component Drawing Number 800 Gear Box.
The change gear box is composed of the change gear, the shaft bolt, fixing shaft bolt and square nut etc. The change gear box is fixed on the left support of the lead screw 101. To cut thread, select the proper change gears according to change gear table. Swing the Change Gear Box 833 to make the gears engage with only about 0.1mm tolerance in between. Then fix screw 835.
The fixed shaft bolt 825 under the spindle is used for right hand cutting and threading. The set of fixed shaft bolt in the accessory ket is provided to work in combination with the original set of shaft bolts to reverse the rotation of the long leadscrew for left hand threading and cutting.
The change gear for Metric or Imperial threading is selected according to the change gear table. The feed amount depends on the material to be cut, the surface roughness and finish requirements. If the two settings, 0.1mm, 0.2mm of the change gear table do not meet the requirements, the operator can add change gears. If the number of teeth of our supplied change gears do not coincide with the calculated teeth numbers, just use gears with similar numbers of teeth.
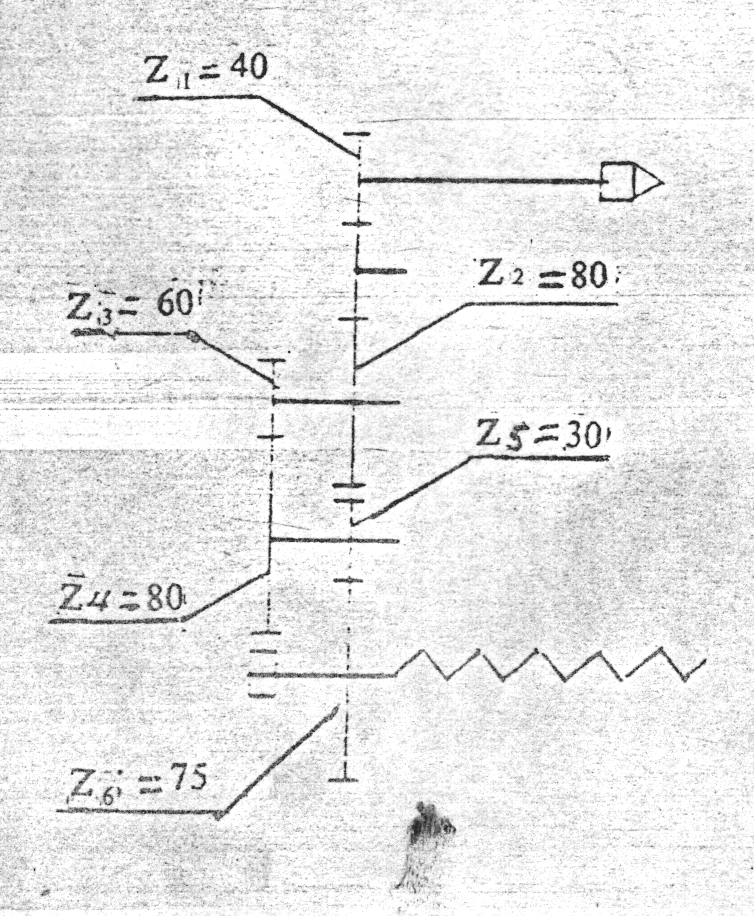
For example:
Request Feed Distance 0.3mm/spindle rotation.
Given spindle gear Z=40 and long leadscrew pitch t=2mm
Feed Distance is Z1/Z2 × Z2/Z4 × Z5/Z6 × t
Solution is 0.3/2 = 10 × 1.5 × 2/20 × 2 × 5 = 40/80 × 60/80 × 30/75
Feed Distance is 40/80 × 60/80 × 30/75 × 2 = 6/20 = 0.3mm

| Number | Description | Qty |
|---|---|---|
| 801 | Change Gear Z:90 | 1 |
| 802 | Change Gear Z:80 | 1 |
| 803 | Change Gear Z:70 | 1 |
| 804 | Change Gear Z:52 | 1 |
| 805 | Change Gear Z:50 | 1 |
| 806 | Change Gear Z:42 | 1 |
| 807 | Change Gear Z:40 | 1 |
| 808 | Change Gear Z:33 | 1 |
| 809 | Change Gear Z:60 | 1 |
| 810 | Washer | 1 |
| 811 | Component of Partial Turn Button | 2 |
| 812 | Change Gear Box Door | 1 |
| 813 | Change Gear Z:25 | 1 |
| 814 | Change Gear Z:75 | 1 |
| 815 | Shaft Bolt | 2 |
| 816 | Nut M12 | 2 |
| 817 | Oil Cup 6 | 2 |
| 818 | Change Gear Z:66 | 1 |
| 819 | Change Gear Z:30 | 1 |
| 820 | Open Washer | 2 |
| 821 | Bearing 101 | 1 |
| 822 | Intermediate Gear Z:40 | 1 |
| 823 | Check Ring 12 | 1 |
| 824 | Washer | 1 |
| 825 | Fix Shaft Bolt | 1 |
| 826 | Washer | 1 |
| 827 | Change Gear Box | 1 |
| 828 | Main Label | 1 |
| 829 | Flat Washer 8 | 6 |
| 830 | Hexagonal Head Bolt M7×16 | 6 |
| 831 | Slide Bearing | 2 |
| 832 | Washer | 2 |
| 833 | Change Gear Rest | 1 |
| 834 | Square Nuts | 2 |
| 835 | Screw M6×35 | 1 |
| 836 | Flat Key 4×16 | 2 |
| 837 | Change Gear Table | 1 |
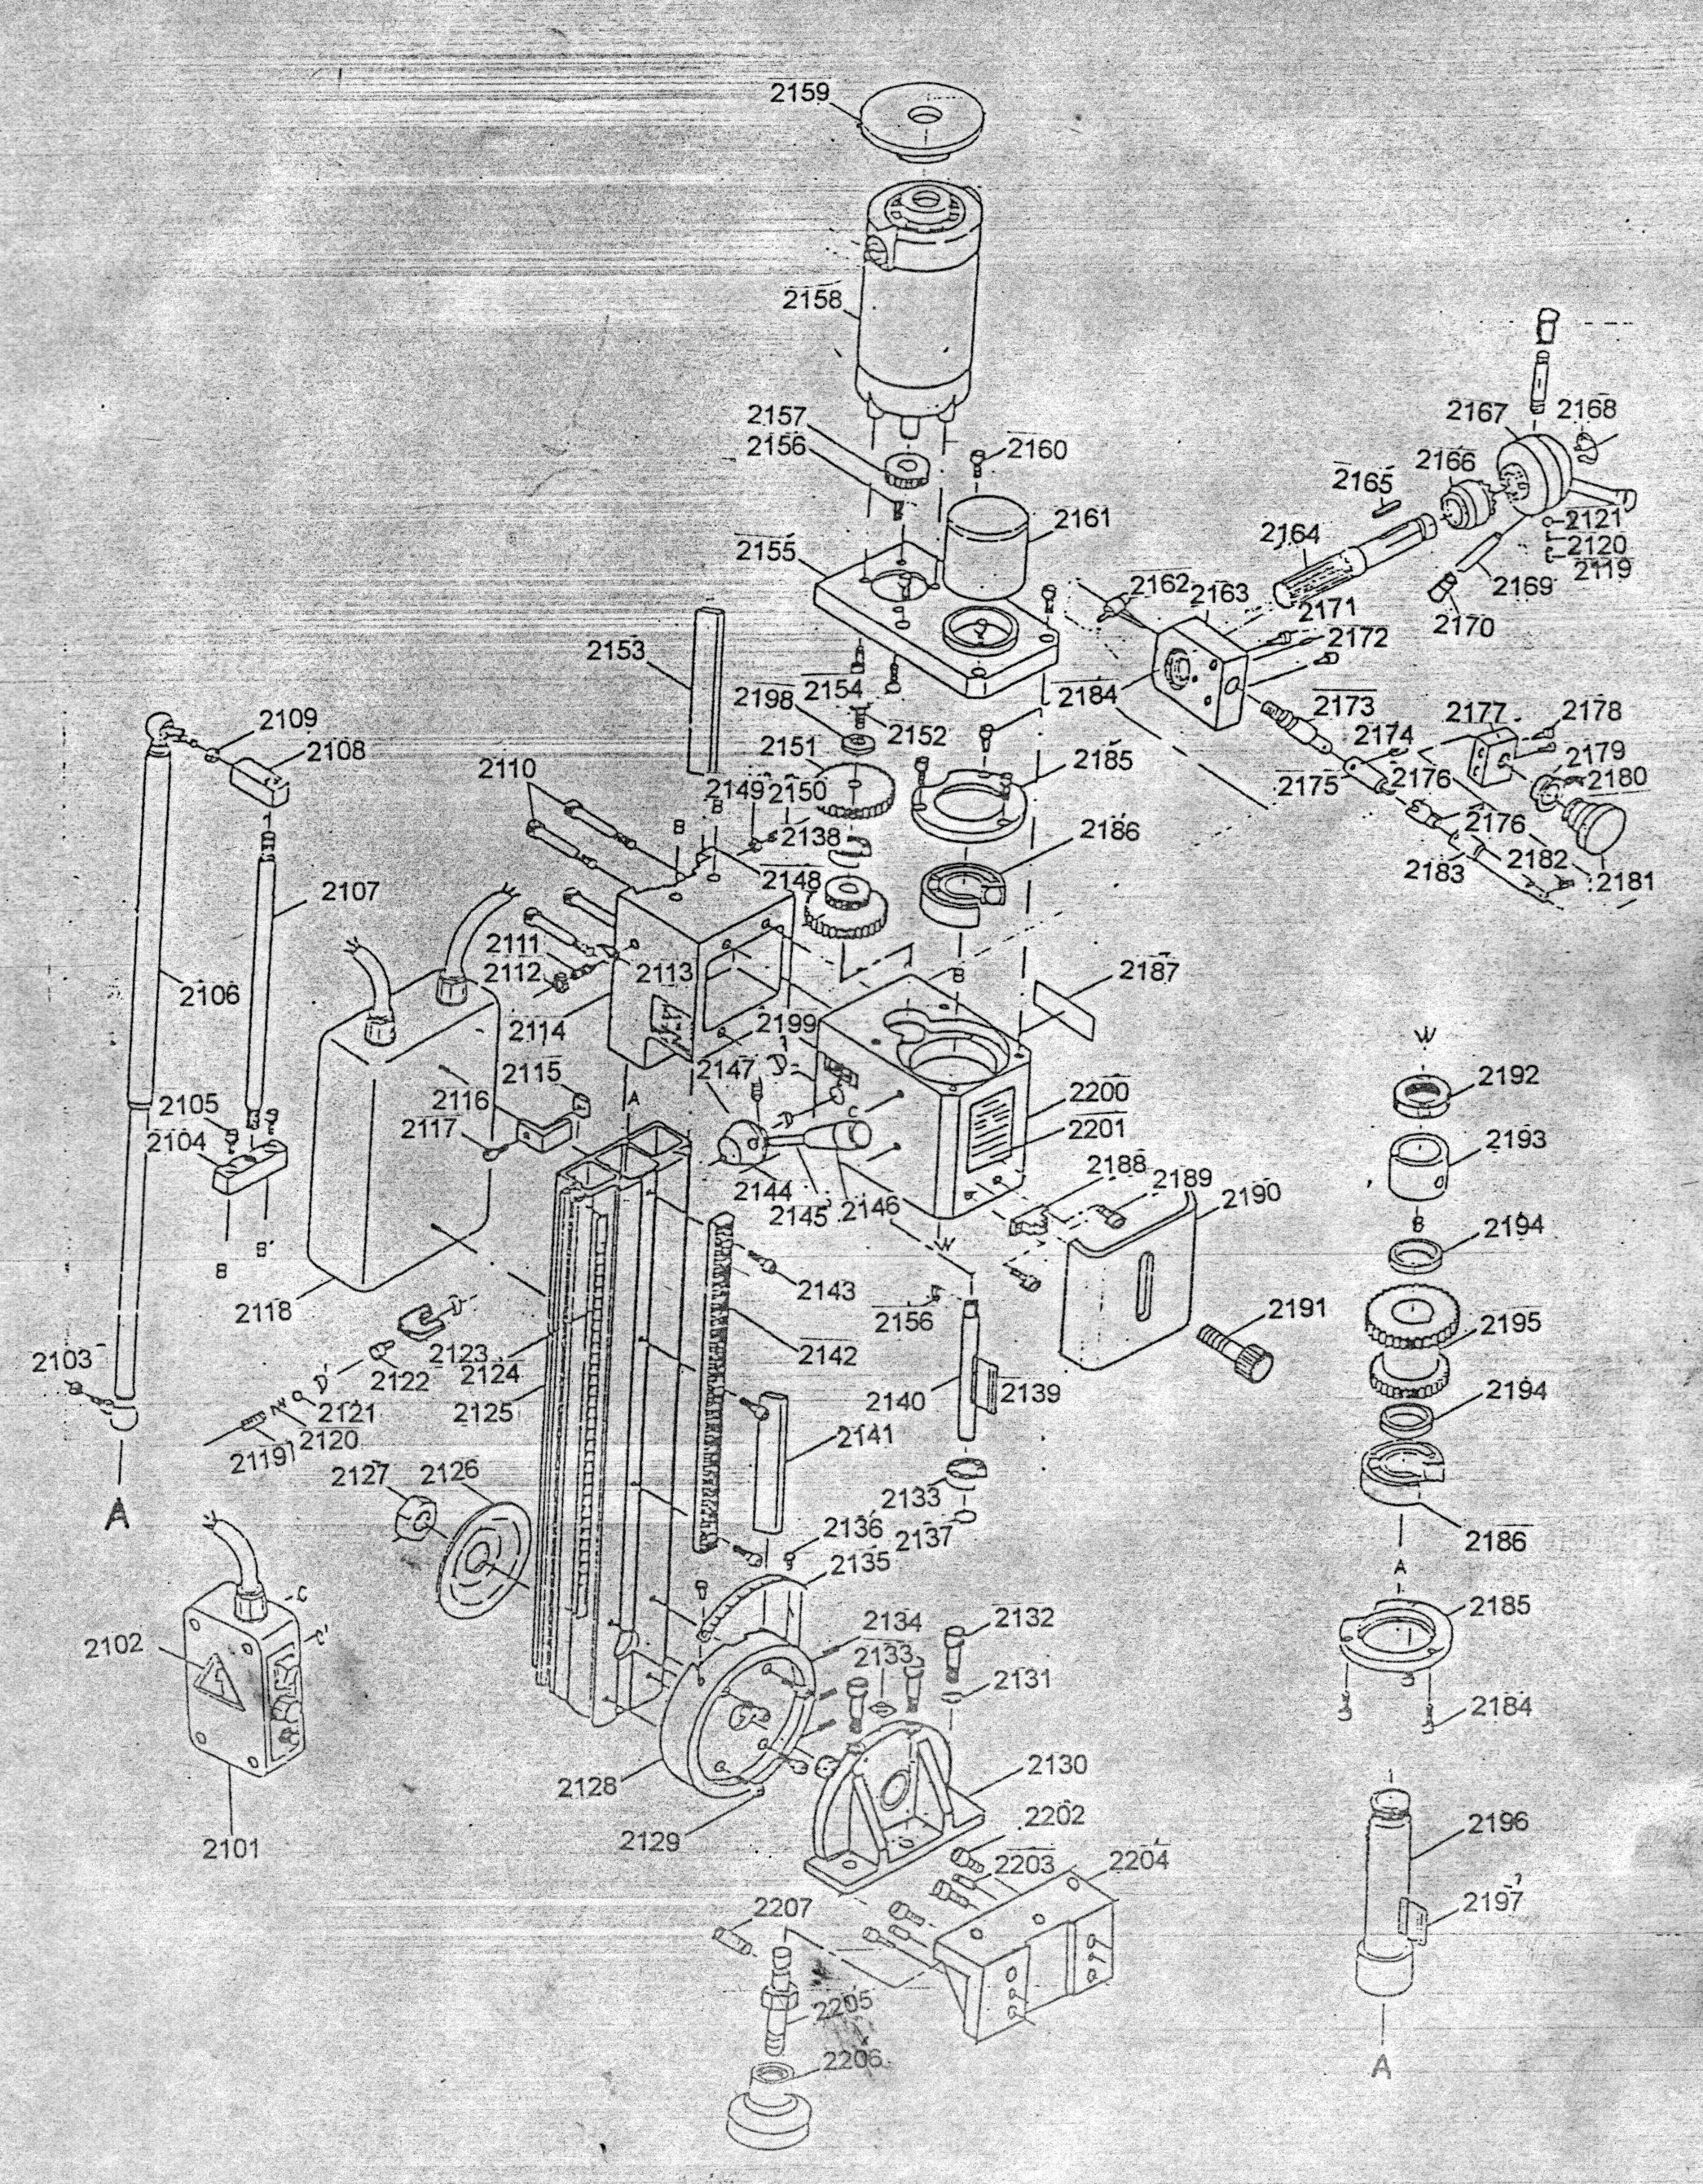
See Component Drawing Number 2100 Milling/Drilling Head Attachment.
Milling/Drilling Head Attachment is mainly composed of the case, spindle bearing, fuselage, bracket, connecting strut, component of cushioning cylinder and fine tuning etc. The Milling/Drilling Head Attachment is fixed by right angle support plate and installed front beside of the multi-purpose machine bed. Its spindle and the feed system are driven by 350W permanent magnet motor installed top of the headstock.
Though motor gear engage a spindle gear directly, it adopts the variable-speed technique. Which makes different speeding freely. Its spindle speed is 0 - 3000RPM. Spindle rise/fall is 200mm. Milling/Drilling Capacity is ∅13mm. You may reach the fine feeding requirement. The feeding distance is indicated by fine tuning scale. The scale is separated in to 30 grade. Each grade is 0.05mm (0.002").
| Number | Description | Qty |
|---|---|---|
| 2101 | Electrical Switch Box | 1 |
| 2102 | Lightning Sign | 1 |
| 2103 | Nut M10 | 1 |
| 2104 | Fix Join Block | 1 |
| 2105 | Screw M6×20 | 1 |
| 2106 | Component of Cushioning Cylinder | 1 |
| 2107 | Join Lever | 1 |
| 2108 | Join Block | 1 |
| 2109 | Nut M10 | 1 |
| 2110 | Screw M8×45 | 1 |
| 2111 | Screw M6×22 | 1 |
| 2112 | Nut M6 | 1 |
| 2113 | Needle | 1 |
| 2114 | Spindle Box Body | 1 |
| 2115 | Square Nut | 1 |
| 2116 | Limit Block | 1 |
| 2117 | Screw M8×16 | 1 |
| 2118 | Control Box | 1 |
| 2119 | Screw M6×6 | 1 |
| 2120 | Spring | 1 |
| 2121 | Steel Ball ∅5 | 1 |
| 2122 | Small Shaft | 1 |
| 2123 | Shifty Rest | 1 |
| 2124 | Scale | 1 |
| 2125 | Fuselage | 1 |
| 2126 | Gasket | 1 |
| 2127 | Nut M24 | 1 |
| 2128 | Connect Strut | 1 |
| 2129 | Screw M6×18 | 1 |
| 2130 | Fuselage Bracket | 1 |
| 2131 | Spring Washer ∅10 | 1 |
| 2132 | Screw M10×30 | 1 |
| 2133 | Label | 1 |
| 2134 | Screw M6×20 | 1 |
| 2135 | Scale | 1 |
| 2136 | Label Rivet 2×4 | 1 |
| 2137 | Check Ring 12 | 1 |
| 2138 | Bearing 8×12×28 | 1 |
| 2139 | Key 4×45 | 1 |
| 2140 | Small Shaft | 1 |
| 2141 | Gib Strip | 1 |
| 2142 | Rack | 1 |
| 2143 | Screw M6×15 | 4 |
| 2144 | Handle Shaft | 1 |
| 2145 | Double End Bolt | 1 |
| 2146 | Long Handle Sleeve | 1 |
| 2147 | Screw M5×8 | 1 |
| 2148 | Slide Double Join Gear | 1 |
| 2149 | Nut M6 | 5 |
| 2150 | Screw M6×22 | 5 |
| 2151 | Gear | 1 |
| 2152 | Screw M5×8 | 1 |
| 2153 | Gib Strip | 1 |
| 2154 | Screw M6×10 | 4 |
| 2155 | Motor Base | 1 |
| 2156 | Key 3×15 | 1 |
| 2157 | Motor Gear | 1 |
| 2158 | Motor | 1 |
| 2159 | Dust Cap of Motor | 1 |
| 2160 | Screw M6×25 | 4 |
| 2161 | Dust Cap | 1 |
| 2162 | Component of Small Handle | 1 |
| 2163 | Worm Support Plate | 1 |
| 2164 | Gear Shaft | 1 |
| 2165 | Key 4×25 | 1 |
| 2166 | Bevel Gear | 1 |
| 2167 | Handle Shock | 1 |
| 2168 | Check Ring 12 | 1 |
| 2169 | Handle Shaft | 3 |
| 2170 | Long Handle Sleeve | 3 |
| 2171 | Screw M5×20 | 2 |
| 2172 | Cylindrical Pin ∅4×15 | 1 |
| 2173 | Worm | 1 |
| 2174 | Taper Pin ∅4×15 | 1 |
| 2175 | Join Sleeve | 1 |
| 2176 | Cylindrical Pin ∅3×12 | 2 |
| 2177 | Bracket | 1 |
| 2178 | Screw M5×25 | 2 |
| 2179 | Dial | 1 |
| 2180 | Sprcing Steel Ring | 1 |
| 2181 | Small Hand Wheel | 1 |
| 2182 | Screw M4×12 | 1 |
| 2183 | Cardam Pinion (I) | 1 |
| 2184 | Screw M5×12 | 6 |
| 2185 | Oil Cover | 2 |
| 2186 | Bearing 16×20×62 | 2 |
| 2187 | Label | 1 |
| 2188 | Dust Cap Bracket | 1 |
| 2189 | Screw M5×16 | 2 |
| 2190 | Organic Glass Dust Cap | 1 |
| 2191 | Clamp Bolt | 1 |
| 2192 | Spindle Nut | 1 |
| 2193 | Tube Separator | 1 |
| 2194 | Tube Separator | 2 |
| 2195 | Fixed Double Join Gear | 1 |
| 2196 | Spindle | 1 |
| 2197 | Key 5×40 | 1 |
| 2198 | Flat Washer ∅5 | 1 |
| 2199 | Change Gear Label | 1 |
| 2200 | Spindle Box Body | 1 |
| 2201 | Main Label | 1 |
| 2202 | Screw M10×40 | 4 |
| 2203 | Taer Pin ∅8×35 | 2 |
| 2204 | Right Angle Support Plate | 1 |
| 2205 | Support Bolt | 1 |
| 2206 | Support Tray | 1 |
| 2207 | Screw M6×10 | 1 |
See Component Drawing Number 10-00 Follow Rest, Component Drawing Number 10-10 Steady Rest.
The Follow Rest is mainly used for cutting long and thin shaft pieces. To use it, fix it with screw 10-07 on to the saddle, turn adjusting bolt 10-02 to such a degree that the two supporting feet of 10-03 touch the workpiece, and will follow the movement of cutting tool, thus ensuring no bending deformation will take place during cutting and better surface finish as a result of less vibration.
The application and principle of the steady rest are similar to those of the follow rest. The difference lies in that it is fixed on bed guides and do not follow the movement of cutting tools. As it has three supporting feet which means an additional supporting point, the workpiece will turn more steadily when used so it is more frequently applied than the follow rest.
One example of its application is center positioning support for medium length shaft cutting to guarentee coaxality of the outer circle and the inner hold.


| Number | Description | Qty |
|---|---|---|
| 10-01 | Clamp Screw | 2 |
| 10-02 | Adjusting Bolt | 2 |
| 10-03 | Supporting Feet | 2 |
| 10-04 | Washer 10 | 2 |
| 10-05 | Follow Rest Body | 1 |
| 10-06 | Hexagonal Nut M10 | 2 |
| 10-07 | Hexagonal Bolt M8×30 | 2 |
| 10-08 | Washer 8 | 2 |
| Number | Description | Qty |
|---|---|---|
| 10-11 | Supporting Feet | 3 |
| 10-12 | Steady Rest Body | 1 |
| 10-13 | Clamp Screw | 3 |
| 10-14 | Adjusting Bolt | 3 |
| 10-15 | Washer 10 | 3 |
| 10-16 | Nut M10 | 3 |
| 10-17 | Nut M12 | 1 |
| 10-18 | Washer 12 | 1 |
| 10-19 | Tailstock Clamp Panel | 1 |
| 10-20 | Square Head Bolt M12×70 | 1 |
See Figure 2 Lubrication Points.
Lubricate the machine according to the lubrication schedule. Lubricate each point once every shift using Number 20 Machine Oil from a forced feed oil can. This is to reduce abrasion of every slide part and let the machine be durable.
| Number | Part to be Lubricated | Lubrication Point |
|---|---|---|
| 1 | Fix Bolt of Intermediate Gear | Oil cup |
| 2 | Leadscrew Support (left) | Oil cup |
| 3 | Small Shaft | Directly On Part |
| 4 | Worm | Directly On Part |
| 5 | Cutter Rest Screw | Oil cup |
| 6 | Cutter Rest Carriage | Oil cup |
| 7 | Tailstock Sleeve | Oil cup |
| 8 | Tailstock Leadscrew | Oil cup |
| 9 | Leadscrew Support (right) | Oil cup |
| 10 | Synchronized Counter Pulley Over Shaft | Oil cup |
| 11 | Change Gear Shaft Bolt | Oil cup |
| 12 | Change Gear Shaft Bolt | Oil cup |
| 13 | Leadscrew Shaft | Oil cup |
| 14 | Bed Guides | Oil cup |
| 15 | Saddle Carriage | Oil cup |
| 16 | Saddle Leadscrew | Oil cup |
| 17 | Saddle Carriage | Oil cup |
| 18 | Bed Guides | Oil cup |
| 19 | Leadscrew | Directly On Part |
| 20 | Bed Guides | Oil cup |
| 21 | Apron | Oil cup |
| 22 | Saddle Leadscrew Support | Oil cup |
| 23 | Bed Guides | Oil cup |
| 24 | Apron | Oil cup |
| 25 | Cutter Rest Leadscrew Bracket | Oil cup |
Carefully unpack the multi-purpose machine and check all items below shows all the contents of the packing box. Do not discard any packing material until the machine is fully assembled and operational. Be sure you have all parts described in the parts listing at the back of the manual.
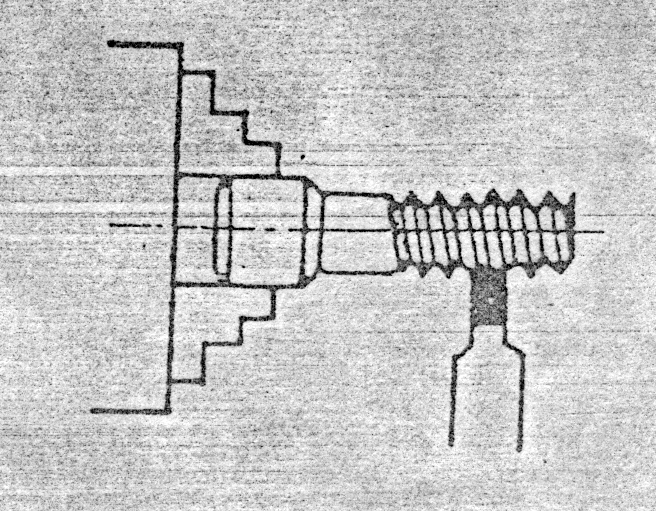
Complete the above steps first, then turn the apron handwheel to right side of the workpiece, push the tool nose with the handwheel to touch the workpiece and push down the handle of the screw-nut. Let the machine feed and cut automatically to the length, meanwhile checking the dimension.
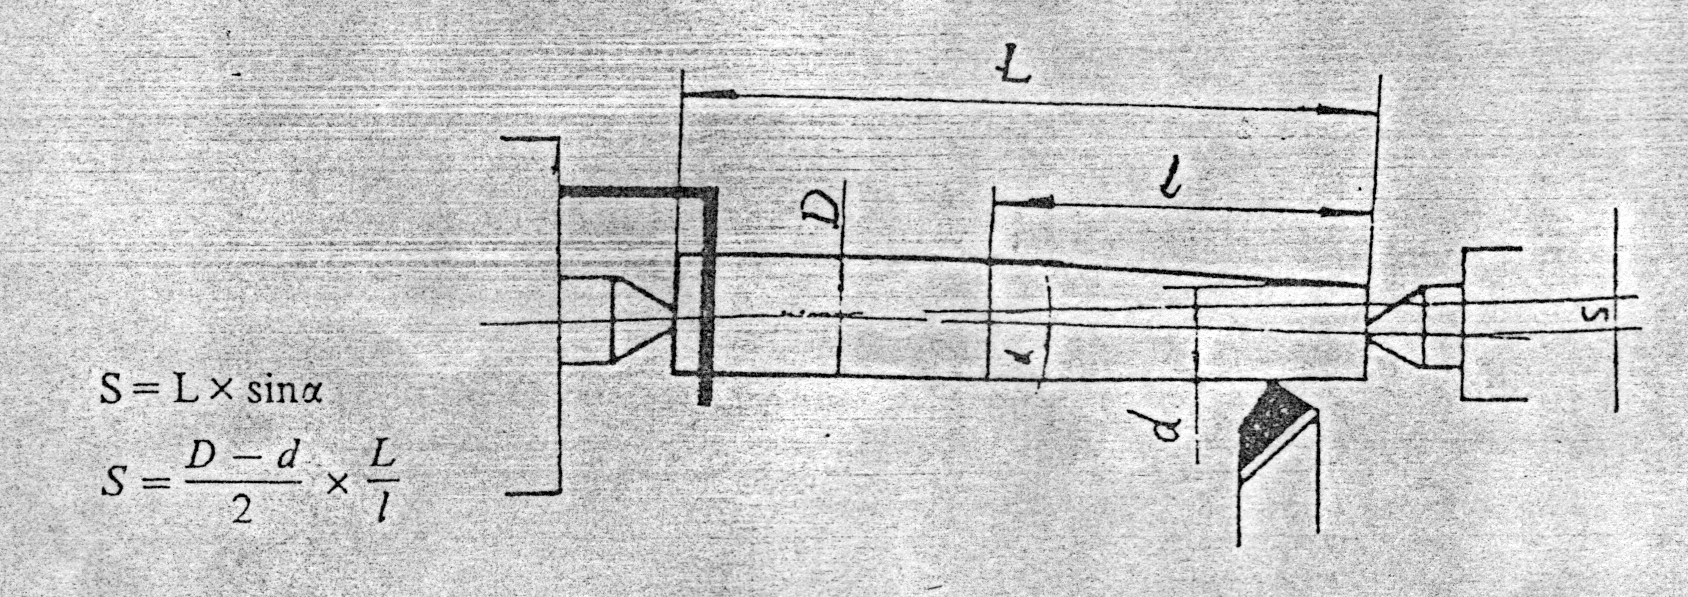
The operation is similar to the machining of cylinders. The cones either be exterior or interior, there are two ways of machining.
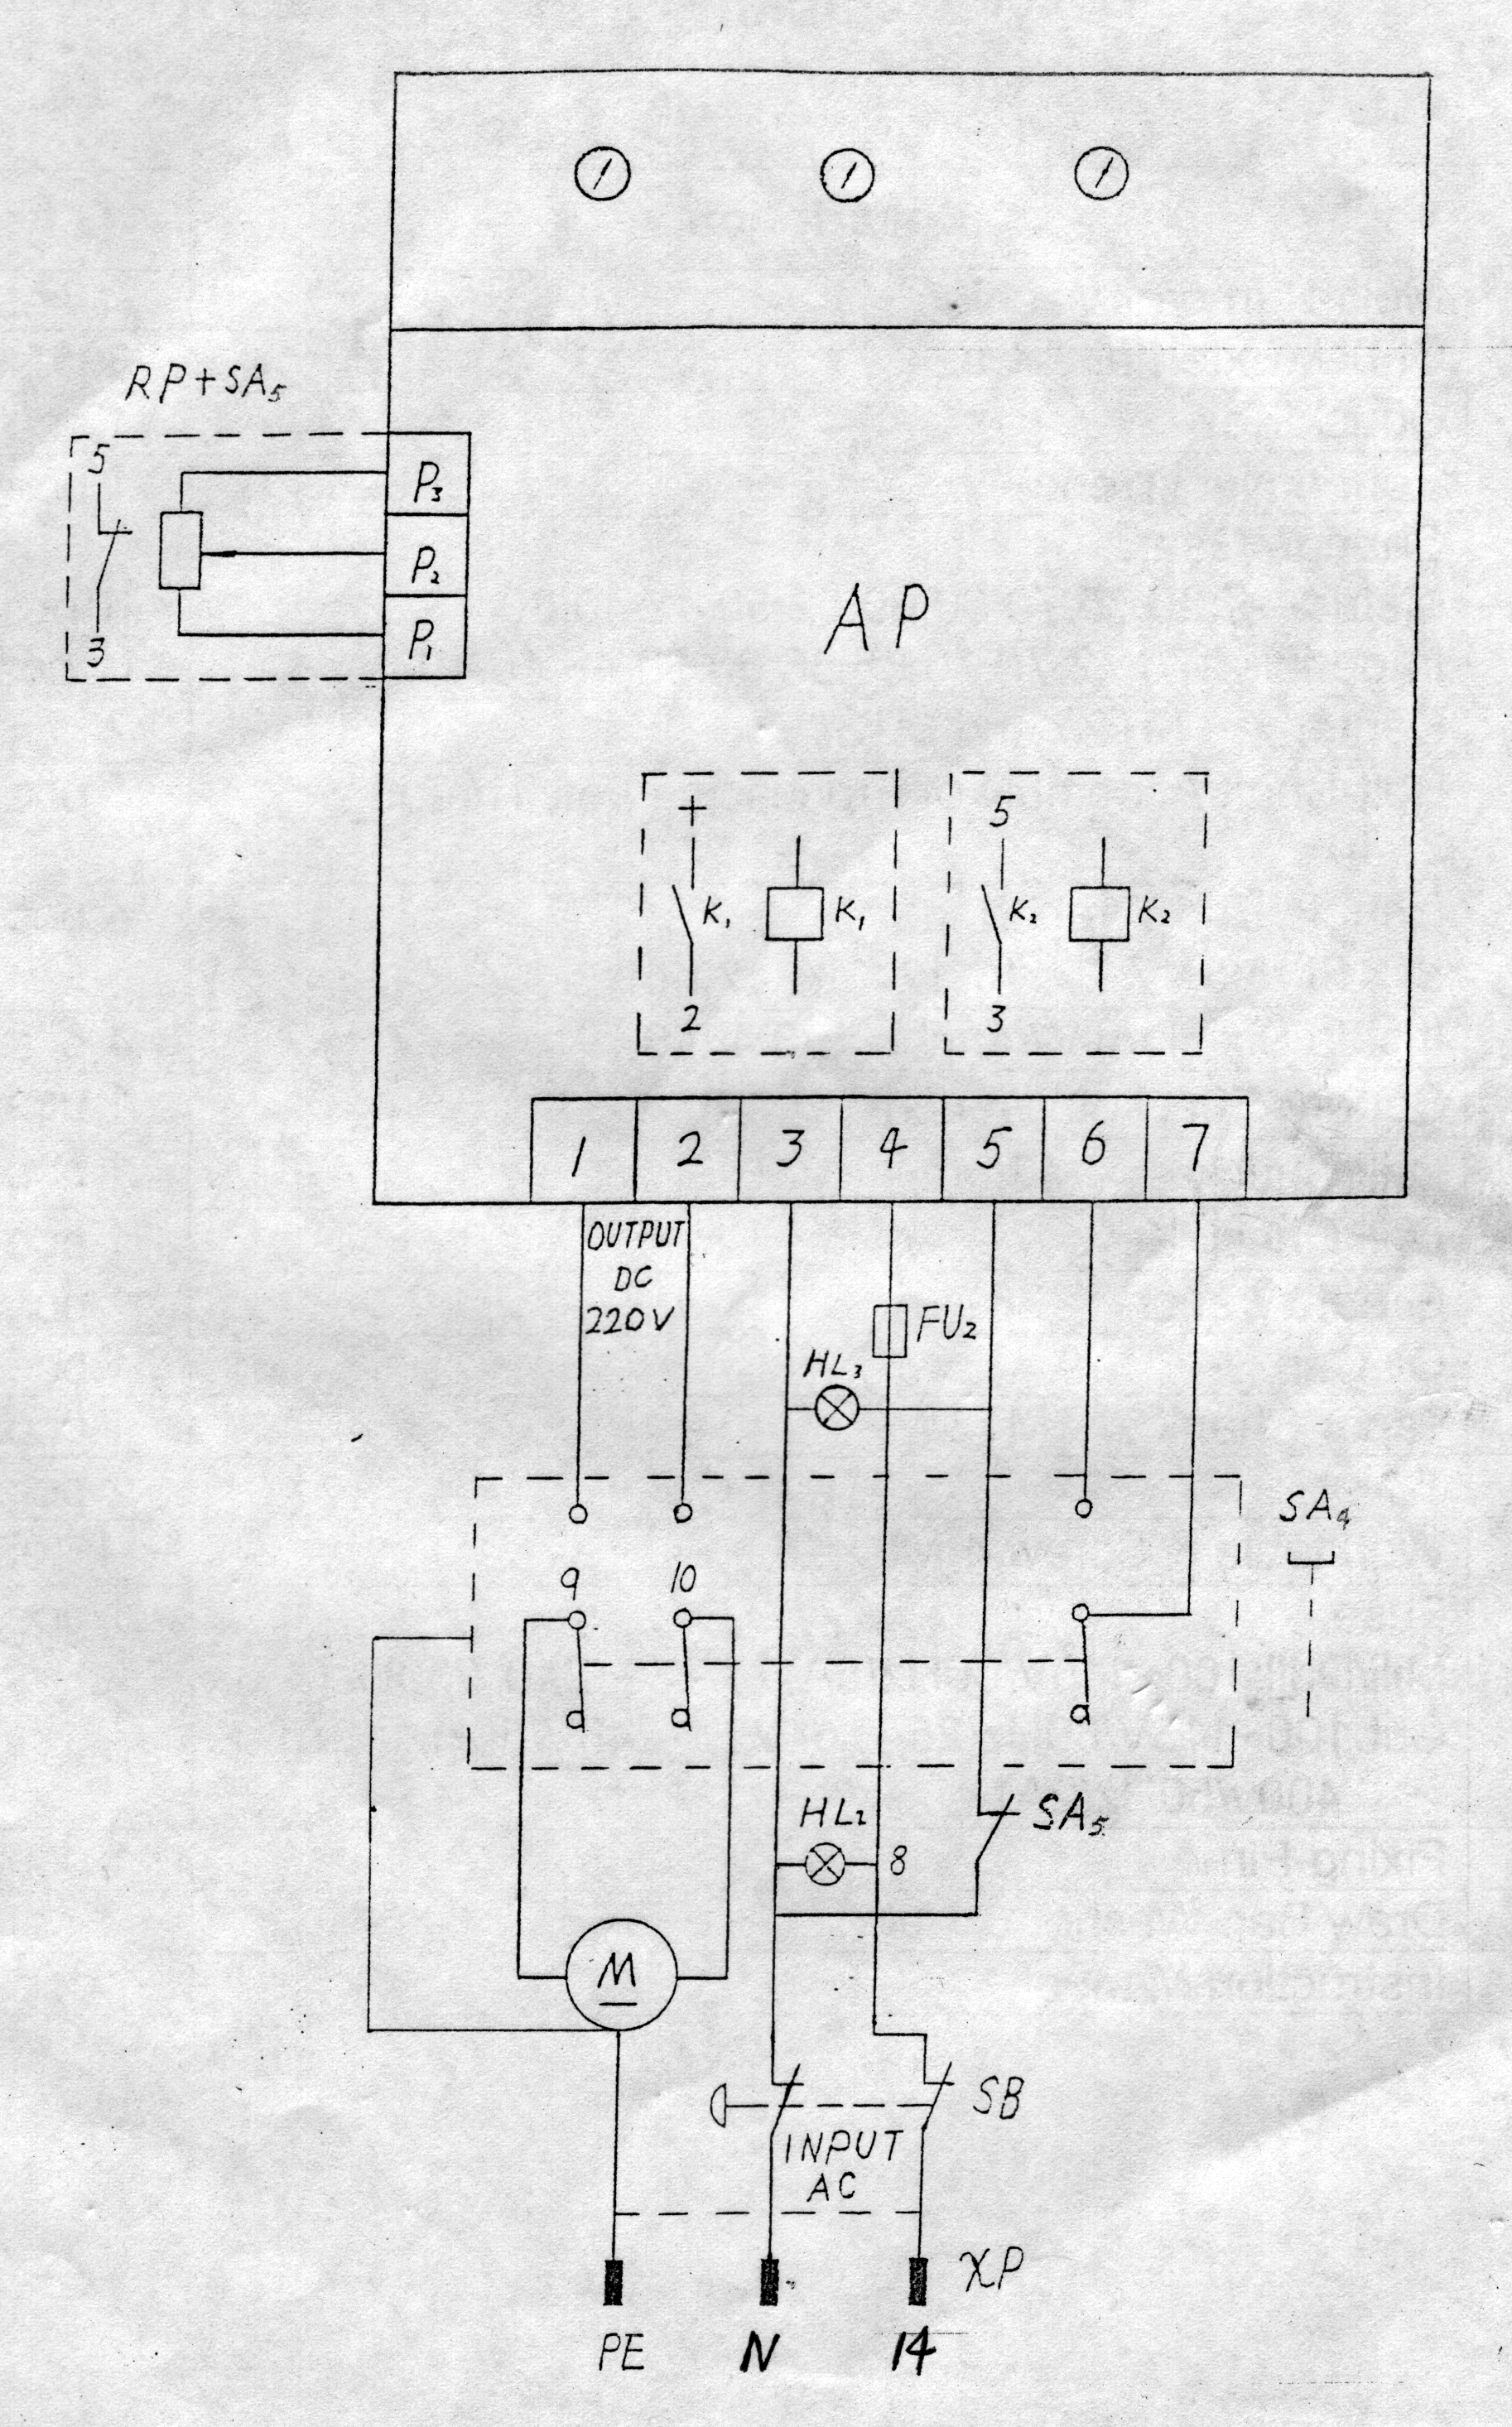
Components Part 1 of electrical system of the Multi-purpose Machine, electric turning single phase asymetric motor (AC). Magnetic Switch, power switch and micro switch, etc.
| Input power source: | 110V/60Hz AC or 230V/50Hz AC or 400V/50Hz AC |
| Power of motor: | 550W |
| Headstock spindle speed: | 2000±10% RPM |
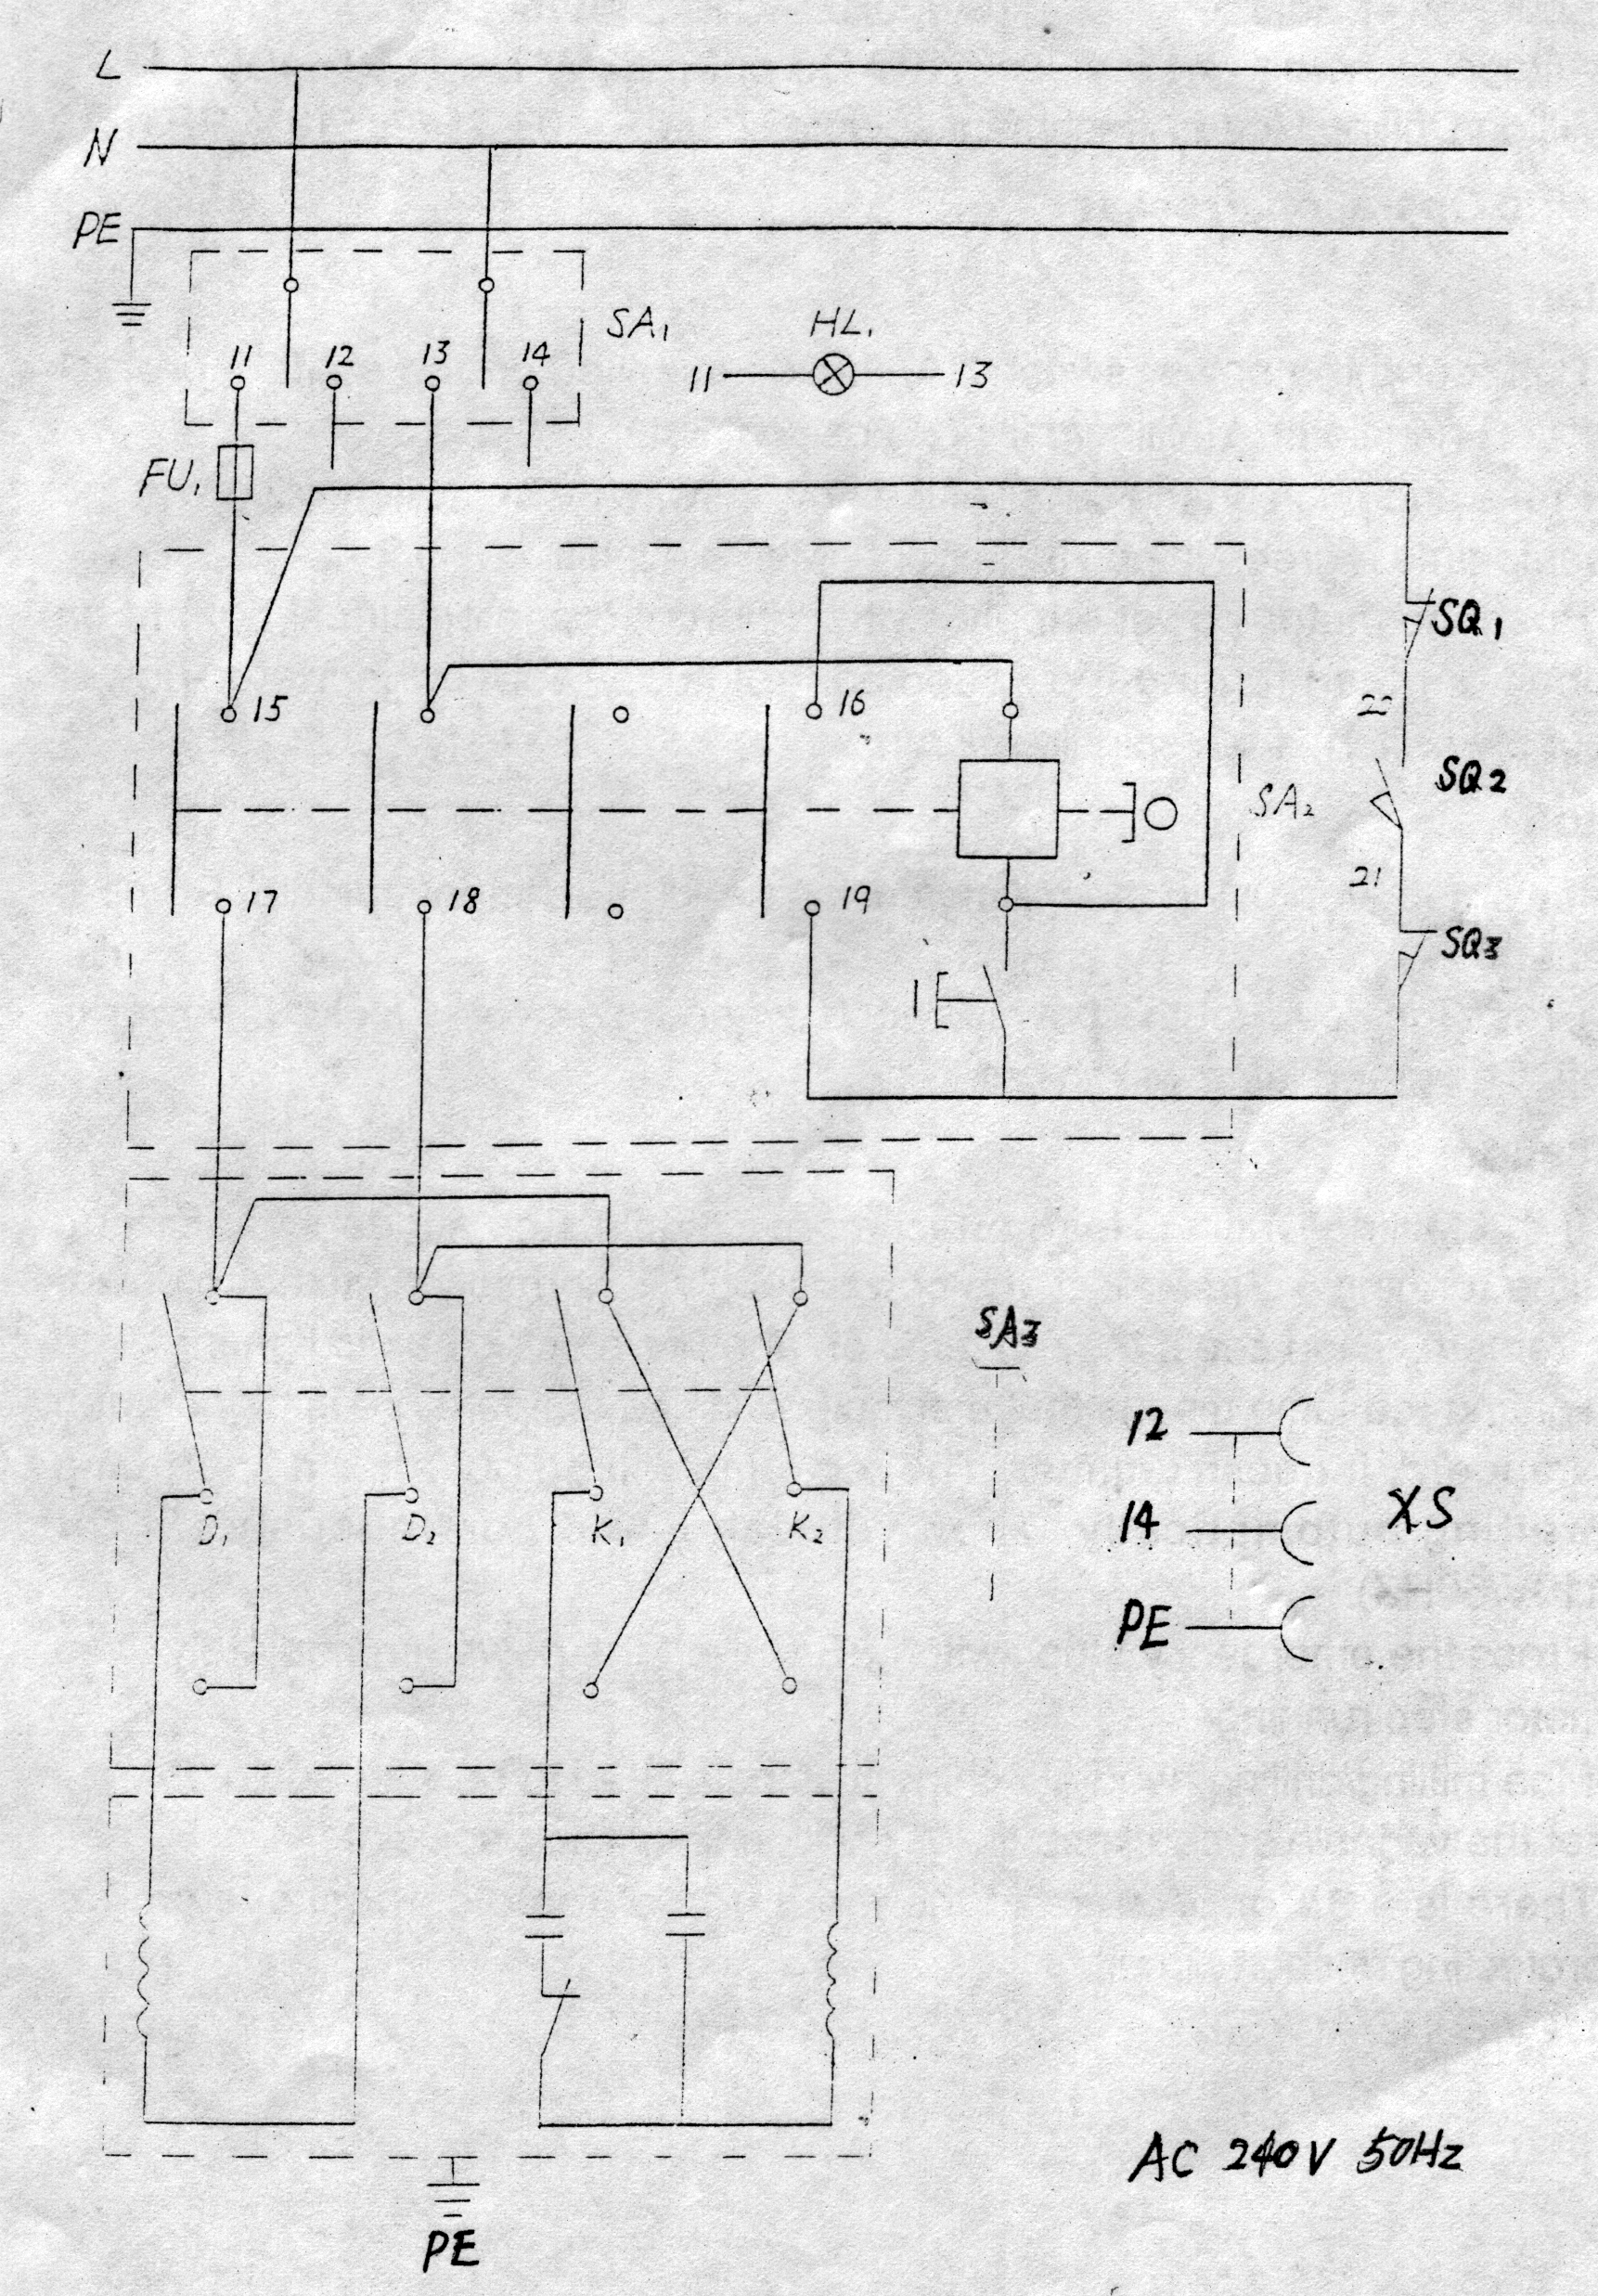
Components Part 2 of electrical system of the Multi-purpose Machine, electric turning circuit board DC motor switch and buttons, etc.
| Input power source: | 110V/60Hz AC or 230V/50Hz AC |
| Voltage of motor: | 0-110V DC or 0-230V DC or 0-400V DC |
| Milling/Drilling Head Attachment spindle speed: | 0-2500±10% RPM |
| Number | Description | Quantity |
|---|---|---|
| 1 | Multi-Purpose Machine | 1 set |
| 2 | Chuck External Jaws | 3 pieces |
| 3 | Chuck Key | 1 piece |
| 4 | Round Nut Wrench D=45~52 | 1 piece |
| 5 | Change Gear: Metric: Z:80,75,70,66,60,60,52,50,42,40,30 Imperial: Z:75,72,70,70,68,66,60,50,48,45,40 | 10 pieces 11 pieces |
| 6 | Center MT2 and MT3 | 2 pieces |
| 7 | Bolt-Shaft Assembly of Processing Left Thread Z:40 | 1 piece |
| 8 | Double End Wrench S1×S2 5.5×7,8×10,12×14,17×19 | 4 pieces |
| 9 | Inside Six Horn Wrench S:3,4,5,6 | 4 pieces |
| 10 | Square Socket Wrench 8 | 1 piece |
| 11 | Drill Chuck ∅13mm | 1 piece |
| 12 | Drill Chuck Key | 1 piece |
| 13 | Great Wrench 36 | 1 piece |
| 14 | Oil Can | 1 piece |
| 15 | Taper Shank MT3 | 1 piece |
| 16 | T-Nut | 2 pieces |
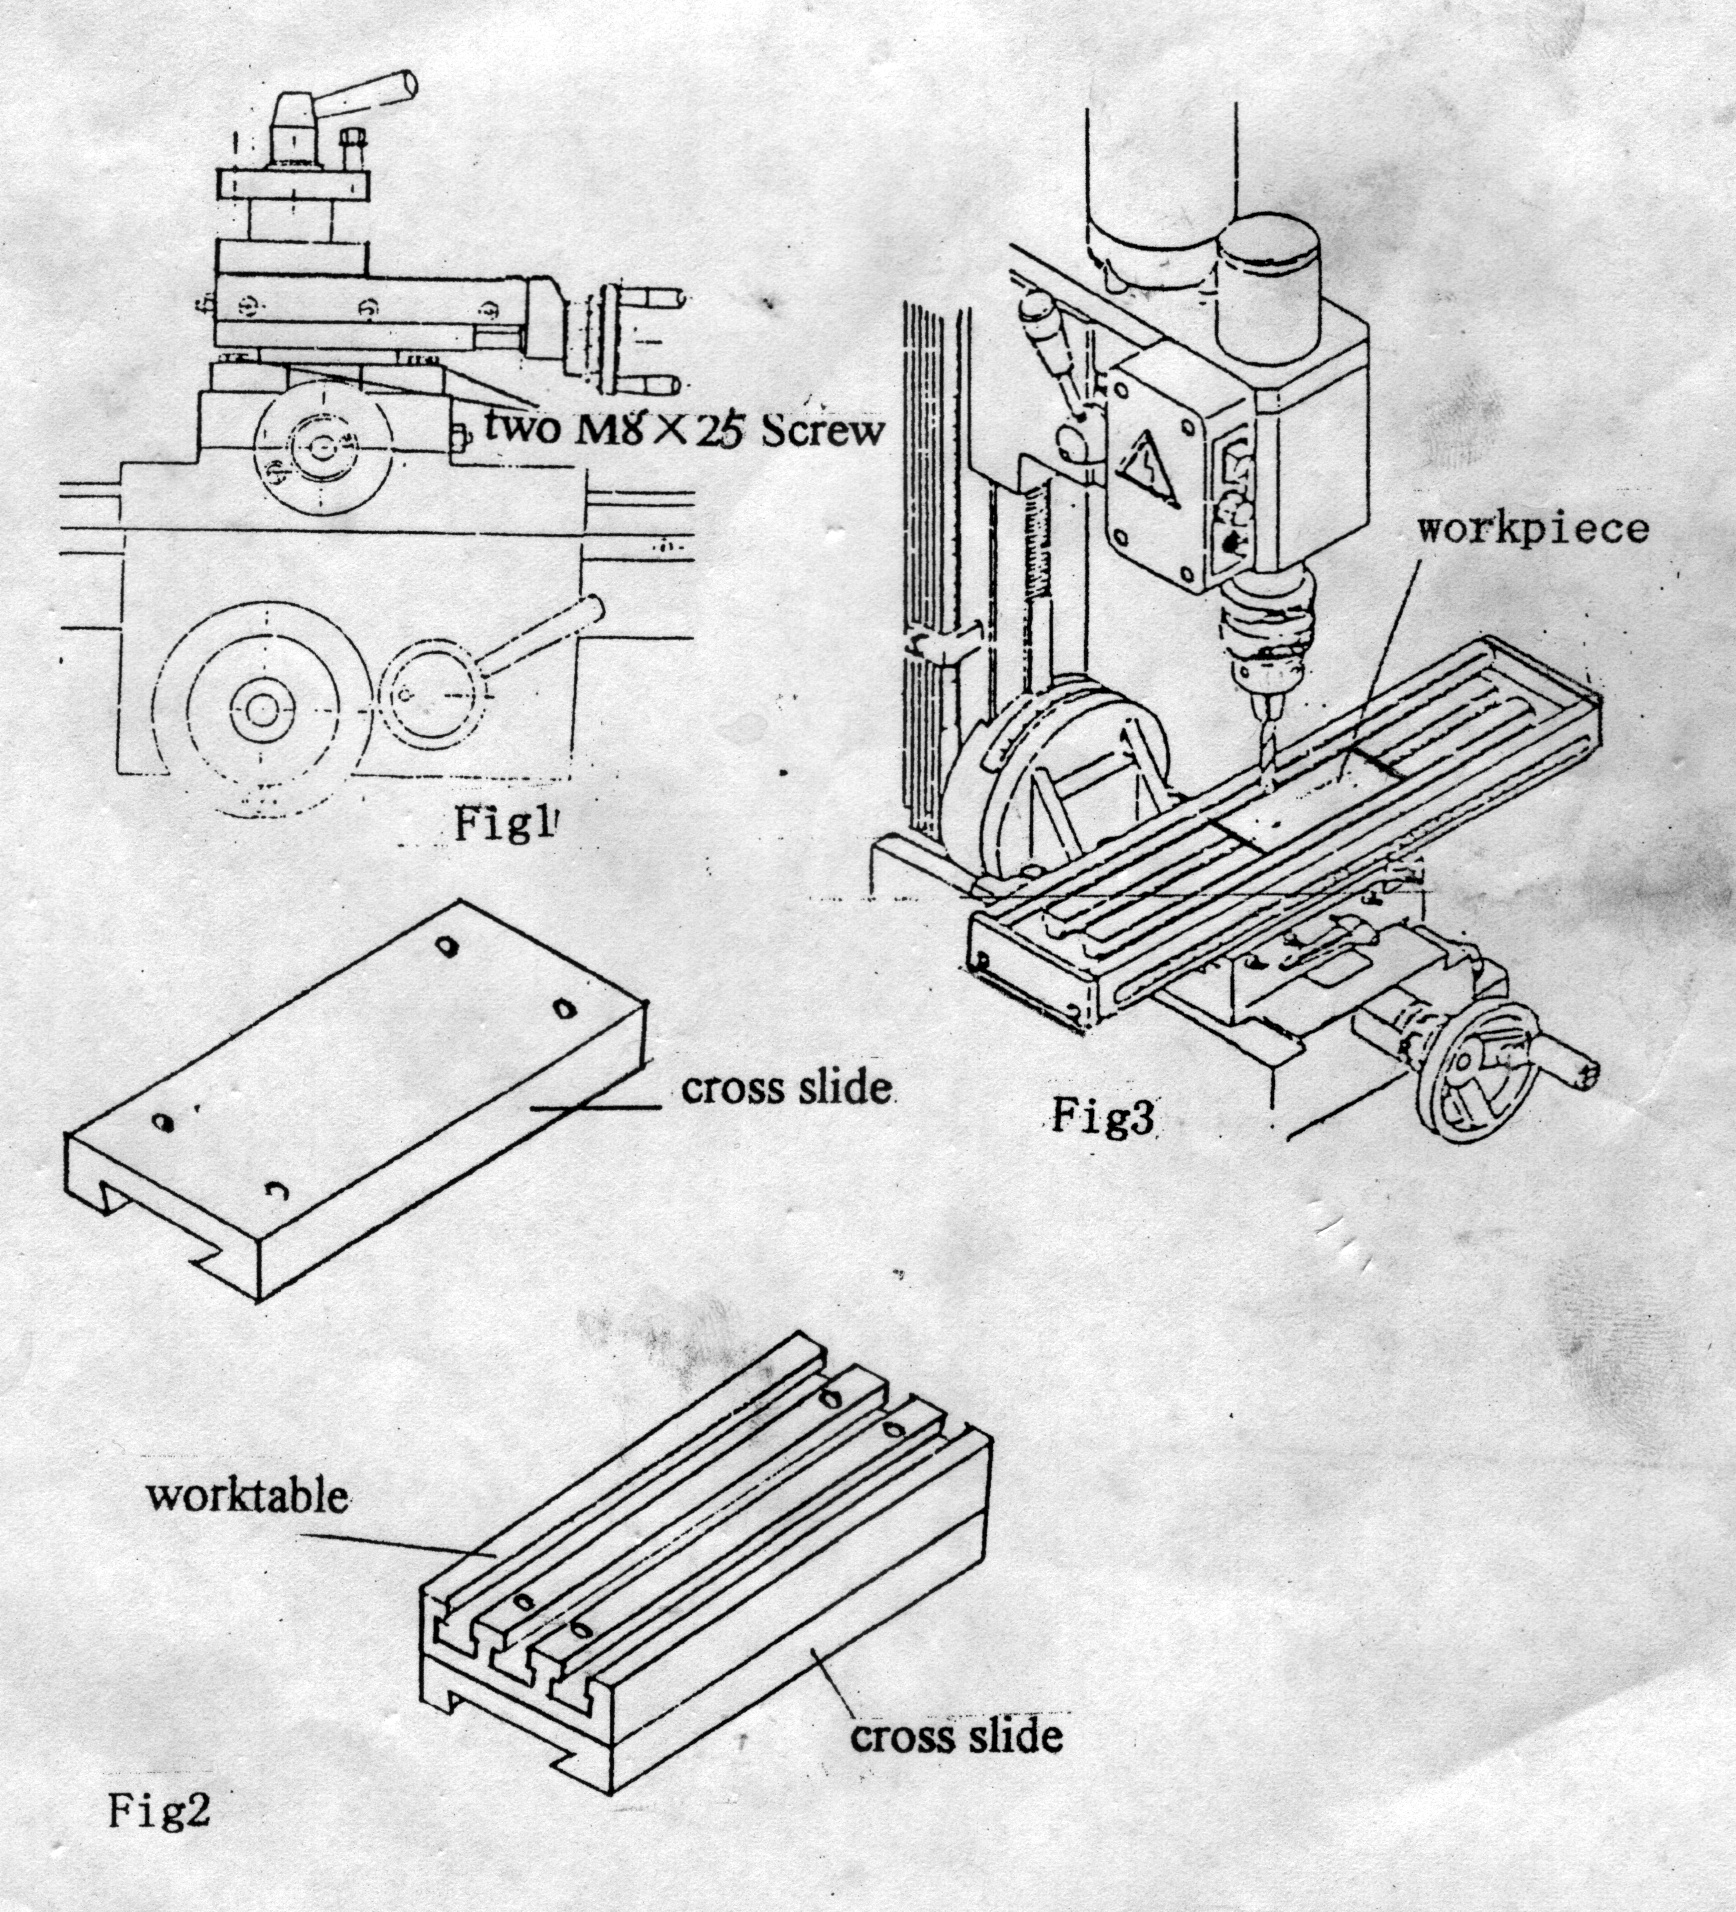
| 17 | Worktable & 4 M8×25 Screws | 1 set |
| 18 | Fuse: Milll/Drill: 110-115V/60Hz(5A) or 220-240V/50Hz(3A) Lathe: 110-115V/60Hz(25A) or 220-240V/50Hz(12A) or 400V/50Hz(2A) | 1 piece |
| 19 | Fixing Pin | 1 piece |
| 20 | Drawbar, Washer & Nut | 1 set |
| 21 | Instruction Manual | 1 copy |